26 May 2014

This blog has moved!


To the readers of this blog on Blogger:

For several years this has run as a shadow blog of the same blog on another server. Please join me there!

Here's the URL:

http://www.ourgrandmotherskitchens.com.

And please visit my new website:

http://www.TinkyCooks.com.

See you around the internet.............

TINKY


12 May 2014

"Just Up" Rhubarb Scones


I know I probably don’t need another scone recipe on this blog—but I had JUST enough rhubarb to make scones yesterday! So that’s what I did.

My generous neighbor Dennis, who has a giant rhubarb patch, encouraged me to pick some of his rhubarb, which is just beginning to come up.

Unfortunately, it was still a tiny bit too early to pick. So I ended up with only a small amount of rhubarb—about a cup and a half chopped.

I made the scones with some of it and stewed the rest. I love stewed rhubarb. Well, I love rhubarb made just about any way. After all, I did name my cat Rhubarb.

Non-Edible Rhubarb

When the patch gets bigger, I’ll try the fabulous-sounding recipe my friend Clare just sent me for rhubarb-meringue bars. (I also love meringue.)

Meanwhile, I recommend these scones. They’re buttery, with a nice balance of sweet and tart. Next time, I might even double the rhubarb!

By the way, if you haven’t caught my latest TV appearance, please watch. I talked a lot (what else is new?), but the hosts and I had a very good time making vintage Mother’s Day fare.


The Scones

Ingredients:

1 tablespoon plus 1/2 cup sugar
2/3 cup chopped rhubarb
2 cups flour
1-1/2 teaspoons baking power
1 teaspoon baking soda
1/2 teaspoon salt
1/2 cup (1 stick) cold sweet butter
1 egg
2/3 cup buttermilk
1/2 teaspoon vanilla
cinnamon sugar as needed

Instructions:

Preheat the oven to 350 degrees. Line 2 cookie sheets with parchment or silicone mats.

Sprinkle the tablespoon of sugar over the rhubarb. Stir and let the mixture sit while you mix the dry ingredients.

Combine the 1/2 cup sugar, the flour, the baking powder, the baking soda, and the salt. Cut in the butter, but be careful not to overmix. Stir the rhubarb into this mixture.

In a separate bowl, combine the egg, buttermilk, and vanilla. Add this mixture to the dry mixture and blend just to moisten the dry ingredients.

Quickly scoop dough (it will be moist) into rounds on the prepared cookie sheets. Small rounds will give you about 16 small scones, but you may also make 8 larger scones. Sprinkle cinnamon sugar on top for added flavor and crunch.

Bake for 18 to 20 minutes for small scones or a bit longer for large ones. Makes 8 to 16 scones.

07 April 2014

Warm Beet Salad


I know beets haven’t arrived in farm stands yet—but I’m looking forward to them! Here is a very fattening but a very fun, delectable, and showy way to use this colorful vegetable.

The recipe comes from my dear friend Michael Collins, the chef at the now closed Green Emporium in Colrain, Massachusetts. Michael and his partner Tony Palumbo are hoping to open a new Mexican restaurant, Mi Vida Loca, in nearby Shelburne Falls soon. I can’t wait to eat there—and I’m hoping the new eatery will have room for a piano so I can perform!

If you have high-speed internet, you can watch Michael prepare the beets with a little help from me by clicking “play” on the video below the recipe.

Just in case you can’t watch videos (I can’t at home in Massachusetts!), I have provided the recipe.

Ingredients:

3 small beets
a small handful of pine nuts
a small, flat bowl lined with all-purpose flower
1 egg
panko bread crumbs as needed
olive oil as needed for light frying
a bed of red-leaf lettuce
a few tablespoons fresh, soft goat cheese
the juice of 1/2 lemon
freshly ground pepper
fresh chives to taste

Instructions:

Quickly wash the beets and immerse them in boiling, salted water. Return the water to a boil, turn it down, and simmer the beets until they are fork tender (about 40 minutes). Drain the beets, rinse them in cold water, and quickly remove their skins and ends. If you wish, you may do this first step early in the day and finish preparing the salad just before you want to serve it.

When you are almost ready to serve the salad, toast the pine nuts in a small iron skillet until they start to smell lovely and begin to brown. Remove them from the pan and set them aside.

Place the flour in one bowl, the egg in a second bowl, and the panko crumbs in a third bowl. Add a small amount of water to the egg, and whisk the egg and water together.

Slice each beet into four slices. Dip the beet pieces first in the flour, then in the egg mixture, and finally in the crumbs.

Pour oil into a 10-inch skillet (enough to cover the bottom). Heat the oil over medium heat. When it is hot, add the breaded pieces of beet and cook them quickly until they are golden brown, turning once. (This will take less than 5 minutes.)

Place the lettuce on a plate, and arrange the fried beet pieces on top. Top each beet with a small amount of cheese; then squeeze lemon juice over all. Sprinkle pepper and freshly cut chives on top of the salad.

Serves 2 elegantly.


27 February 2014

Memory Lane Brownies


I just realized that I haven’t posted on this blog in February. Luckily, I just made something that was definitely blogworthy so I will squeak in a February post.

Wednesday evening I spoke to a group in Alexandria, Virginia, about my book Pulling Taffy. The fun, interested and interesting crowd included one of my college dorm mates, Jo-Ann McNally (as gorgeous and peppy as ever); a man who had known and loved my darling honorary godmother Dagny Johnson; the wonderful Joan Sutton, my mother’s geriatric adviser; and a number of people who had lived through dementia care themselves. I had a wonderful time and came home with a gift from my hosts as well as money from book sales. (I love money!)

Family members also came—and I wanted to have something easy yet tasty on hand to serve them after the program. It was snowing the morning, and I really didn’t feel like taking the Tinkymobile to the grocery store to purchase any exotic ingredients. Fortunately, I thought of Keith Brownies.

This brownie recipe may be found in a book called Treasury of Tennessee Treats, published by the Keith Memorial Church in Athens, Tennessee, home of my college roommate Kelly Boyd. I wish I had a photo of Kelly and me at Mount Holyoke to show you, but all of those photos are in another state. Picture two long-haired, short, slightly plump, astronomy-and-film-loving young girls with big smiles, and you won’t be far off.

Kelly and I made these brownies back in the day—and a couple of years ago when I asked her for the recipe she sent me her late Aunt Lucile’s copy of the cookbook. Lucile Mitchell made the first and the best cream candy I ever tasted, and I am honored to have her cookbook in my collection.

In addition to the brownies and many other dishes, the Keith Cookbook features one of those charming, sentimental “recipes” for a good life favored by community-cookbook committees in generations past. (The copy I have, the book’s second edition, was published in 1962.) I’m sure the ladies wouldn’t mind my reprinting it. Its message is sappy but inspiring.


To tell you the truth, the brownies didn’t QUITE live up to my memory of them. (It’s very hard for anything to live up to a memory.) They were still extremely tasty, however—somewhere between fudgy and cakey in consistency—and no one seemed to have any trouble eating them!

Best of all, they took no time at all to make and used ingredients I ALWAYS have in the house. I will definitely keep them in my repertoire. I hope you enjoy them, too.


Keith Brownies
Adapted from Treasury of Tennessee Treats (Aunt Lucile’s copy)

Ingredients:

1/2 cup butter at room temperature
1 cup sugar
2 eggs
1/2 cup cocoa
1/2 cup flour
1 teaspoon vanilla
1/2 cup chopped nuts (optional)

Instructions:

Preheat the oven to 325 degrees. Butter an 8-by-8-inch pan. Cream together the butter and sugar with a wooden spoon. Beat in the eggs; then stir in the remaining ingredients.

Bake for 25 minutes. Cut into bars. The original recipe suggested cutting 16 squares, but I cut about 30! I love serving tiny treats and then allowing for seconds.

29 January 2014

Souper Bowl of Dip (with Chips!)


I have a confession to make. I have always had a weakness for dip made with packaged onion-soup mix. When I was little and my mother made it (very occasionally, I must add) it seemed like a miracle that all that flavor could come out of one small package stirred into some sour cream.

As a grownup I’m more skeptical about packaged foods than I was as a child, when they were a novelty. And I have to shudder when I read the side of an onion-soup package. I don’t really think a creamy dip needs things like partially hydrogenated soybean oil, caramel color, corn syrup, and disodium inosinate. I don’t know what that last item is—and neither does my computer’s spelling program—but I’m pretty sure it’s not what one could call a food, let alone a healthy food.

I do still love onion dip, however. And it’s an easy, tasty snack for the Big Game—or the “Superb Owl,” as The Colbert Report calls it since the NFL threatens to sue anyone else who uses the official terminology.

As this football event approaches I am concocting a more natural version of my childhood guilty pleasure. This dip starts with the base my mother used for her cordon bleu French onion soup—caramelized onions, mustard, and wine. She used red wine, but I was darned if I was going to open a bottle of wine for the minuscule amount I wanted so I used sherry. If you feel like drinking red wine, by all means substitute it for the sherry.

I can see adding additional ingredients another time—a little Creole seasoning for kick, some herbs (parsley? dill? thyme?), and/or a few drops of Worcestershire sauce. On Sunday as I watch the Broncos and the Seahawks battle it out, however, I plan to serve it just as it is below. This onion-dip recipe takes a little more time than the package-based version, but it’s by no means difficult. The resulting spread tastes fresh yet mellow, and highly satisfying—like French onion soup on a chip.

It tastes best with homemade vegetable chips. We made sweet-potato chips yesterday. I won’t tell the Culinary Recording Angel if you go out and buy some, however.

Mustard is added to caramelizing onions.

French Onion Dip

Ingredients:

2 teaspoons butter
1 tablespoon extra-virgin olive oil
2 large onions, cut into thin slices (my slices could have been thinner!), with each slice cut in half
1/2 teaspoon Dijon mustard (I used mustard with a little garlic, which lent a lovely flavor)
1 tablespoon dry sherry
salt and pepper to taste (I used about 3/4 teaspoon sea salt and three grinds of the pepper mill)
1-1/2 cups sour cream (half of this could be Greek yogurt if you want to be healthier)

Instructions:

The dip is best prepared early in the day or the night before you wish to serve it. It needs time in the refrigerator to let its flavors blend and mature.

Combine the butter and olive oil in a nonstick skillet over medium-low heat. When the butter melts stir in the onion slices. Cook them slowly, stirring every 5 minutes or so, until they are reduced and turn a lovely golden brown. This will take at least 1/2 hour and may take as long as an hour.

When the onions are almost ready stir in the mustard, and continue to cook, stirring, for at least five minutes. Add the sherry and cook, stirring, until the liquid disappears.

Sprinkle salt and pepper over the onions and remove them from the heat. Allow them to cool to room temperature. If you want to avoid having strings of onion in your dip, chop them a bit once they have cooled.

Put the onions and sour cream in the bowl of an electric mixer and stir briskly to combine.

Place the dip in the refrigerator, covered, and let the flavors combine for several hours. At least an hour before serving taste it on a neutral cracker to see whether you want to add any additional flavors (more salt and pepper perhaps?). Bring the dip to room temperature, and serve it with vegetable chips.

Makes about 2 cups.


Cold-Oil Sweet Potato Chips

My sister-in-law Leigh and I actually made two kinds of chips to go with our test dip—one batch fried and one batch baked. HOWEVER, I’m only giving you the recipe for the fried batch because we were so busy eating the fried chips (they were AWFULLY tasty) that I forgot to time the baked ones. They are obviously healthier than the fried version.

I’ll tell you how we did the baked ones, but I won’t officially publish the recipe until I make them again! Basically, one slices the sweet potatoes just as one does below for the fried chips. One combines extra-virgin olive oil (about 1 tablespoon) and sea salt (about 1/2 teaspoon) in a bowl; then one stirs in the slices of sweet potato until all are coated with a tiny bit of oil. The slices go on cookie sheets in a preheated oven (325-ish) until they finish cooking; I THINK this is about half an hour. One should stir/turn the potatoes after 10 minutes and check on them frequently.

Now for the FRIED version. Leigh has a mandoline slicer, which made creating the chips a breeze. I got the idea for cold-oil frying the chips from my friend Devany Vickery-Davidson in Charleston, South Carolina. Apparently, cold-oil frying is very chic, but I had never heard of it until Devany wrote about making French fries this way. It is less messy than hot-oil frying and a lot simpler.

Leigh works her mandoline magic.

The Chips

Ingredients:

1 sweet potato, peeled and sliced thinly
canola oil at room temperature as needed
sea salt as needed

Instructions:

Place the pieces of sweet potato in a deep, heavy skillet or saucepan. Spread them out as much as you can. Cover them with oil; then add a little more oil. Place the pan on medium heat. Stay by the stove.

In a few minutes the oil will begin to bubble. Stir the potato pieces a bit and keep heating them. As the potatoes cook stir them every minute or two to keep them from sticking together—and to monitor them. In a very few minutes they will brown and crisp up very quickly.

Use a skimmer or tongs to remove the chips from the oil. (Don’t forget to turn off the stove!) Drain them on paper towels, and sprinkle salt on top.

Let the chips cool for a couple of minutes; then serve them with dip. Makes about 20 chips. (The number depends on the thickness of your slicing.)

23 December 2013

Pumpkin Puffs

A while back I wrote about the ways in which cooking and music can both be viewed as folk practices. We start with a melody (or a recipe) that has been handed down for generations and put our own little tweak on it, allowing it to evolve.

As Christmas approaches and we’re surrounded by holiday music, I’m struck by another way in which cooking and music resemble each other.

My neighbor Alice Parker, a composer and conductor who excels at getting groups of people to sing with all their hearts (even if they don’t think they can sing!), often exhorts her singers to leave the notes on the page behind.

Music, she says, isn’t notes on a page. It’s what fills a room when singers and instrumentalists lift their eyes off that page and start interpreting the emotions behind the notes.

Music is something concrete plus a group of people coming together plus a little bit of magic.

That description also applies to cooking—particularly at this time of year, when we frequently cook alongside our families and neighbors.

This recipe came together in a group. My apartment complex in Virginia hosts cooking demonstrations from time to time. We thought it might be fun to try a holiday cookie swap. It took place last weekend. Community members brought their own cookies and recipes. As they munched and we talked I threw together a couple of batches of cookies (including my seasonal illumination cookies).

I naturally wanted to try baking something new … or at least new-ish. Those of you who read a lot of my writing will recognize the concoction below as a combination of two formulas: a basic pumpkin pie and the cranberry cream puffs I made a couple of years ago.

I wasn’t sure it would work, but it seemed worth trying. Luckily, I had lots of help filling the puffs from my fellow apartment dwellers.

(I wish I had photos of the event, but we were too busy cooking to remember to take them! I did take one of the final product and one of the filling.)

In end, we decided that this “new” holiday recipe was a definite keeper. So I offer it to you, along with my wishes for a delicious Christmas and a healthy, happy, peaceful new year.


Pumpkin Cream Puffs

I know it sounds as though this recipe has a LOT of steps. You can do much of the preparation in advance however. The custard may be done the day before and refrigerated. Ditto the caramel sauce (and you can always skip that and just dust a little confectioner’s sugar on top of your puffs).

Even the cream puffs can be made in advance and frozen for a day or two. Refresh them by baking them, lightly covered with foil, at 350 degrees for 10 minutes. If you prefer to purchase frozen cream-puff shells, feel free to do so. The filling is the important part of the recipe.

Ingredients:

for the custard:

1-1/2 cups pumpkin or winter squash puree
1/2 cup white sugar
1/2 cup brown sugar, firmly packed
1 teaspoon cinnamon
1/2 teaspoon salt
1/2 teaspoon ginger or allspice (or a bit of each)
1 cup evaporated milk
1/2 cup water
2 eggs

for the cream puffs:

1 cup water
1/2 cup (1 stick) sweet butter
1-1/4 cups flour
1/4 teaspoon salt
4 large eggs at room temperature (place them in warm water for a few minutes to achieve the right temperature)

for the optional caramel sauce:

1 cup sugar
1 cup heavy cream
1 teaspoon sea salt or kosher salt
2 teaspoons vanilla

for the filling:

2 cups heavy cream
confectioner’s sugar and vanilla to taste (we used about 2 tablespoons sugar—maybe a little more—and 2 teaspoons vanilla)


Instructions:

for the custard:

Make the custard early—ideally the day before—so it will have plenty of time to cool.

Preheat the oven to 425 degrees and grease a 9-inch pie dish. Combine the custard ingredients, and place them in the pie dish. Bake for 10 minutes; then reduce the heat to 350 degrees and bake for another 30 to 40 minutes, or until firm. Allow the custard to cool to room temperature; then cover it and refrigerate it until you are ready to assemble the puffs.

for the optional but good caramel sauce:

In a heavy, wide-bottom pan that holds at least 2 quarts slowly melt the sugar over medium-low heat. You may push the sugar in from the edges with a heavy spoon or heat-resistant spatula, and you may shake the pan over the heat. Try to avoid stirring the sugar, however. Be very careful; melting sugar can be extremely hot.

When the sugar has melted and turned a lovely caramel brown, remove it from the heat and whisk in half of the cream, followed by the other half plus the salt and vanilla. The sauce will bubble furiously.

If for some reason the sauce seizes (that is, the sugar hardens and doesn’t get absorbed by the cream), put it back over low heat until the sugar melts. Set the sauce aside. If you are making it in advance, cover and refrigerate it when it gets to room temperature so that it will last until you are ready to use it.

for the puffs:

Preheat the oven to 375 degrees. Lightly grease two cookie sheets or line them with silicone.

In a medium saucepan bring the water, butter, and salt to a rolling boil. Throw in the flour all at once. Using a wooden spoon stir it in quickly until it becomes smooth and follows the spoon around the pan. Remove the pan from the heat.

Let it rest until it is cool enough so that you can stick your finger in and hold it there for a few seconds (this takes very little time).

Place the dough in a mixer bowl, and beat in the eggs, one at a time, beating vigorously after each egg. Make sure you continue beating for 1 minute after the last egg goes in. The dough will be stiff.

Drop teaspoonsful of dough onto the cookie sheets, leaving enough space between them so the puffs can expand to golf-ball size in the oven.

Bake the pastries until they puff up and begin to turn a light golden brown—about 15 minutes.

Remove them from the oven and quickly use a sharp knife to cut a small slit in the side of each puff. (This keeps the puffs from getting soggy.) Return them to the oven for 5 more minutes. If the puffs seem in danger of burning, reduce the temperature to 350 degrees.

Remove the puffs from the oven and cool them on wire racks.

for the filling:

Just before you are ready to assemble your puffs, whip the cream until it is thick and forms nice peaks, adding the sugar and vanilla toward the end of this process.

Use a whisk to break up the pumpkin custard. Gently fold it into the whipped cream.

for assembly:

Carefully cut open each puff in the middle; you will find that each of them has what King Arthur Flour (from which I slightly adapted the puff recipe) calls a “natural fault line.”

Decorate the bottom of each puff with the pumpkin-cream mixture and replace the top. Drizzle a little caramel sauce on top if desired. (If you prefer a little confectioner’s sugar, go for that.)

This recipe makes about 40 cream puffs. You may make fewer puffs by making them a little bigger—or even more puffs by making them smaller.

06 December 2013

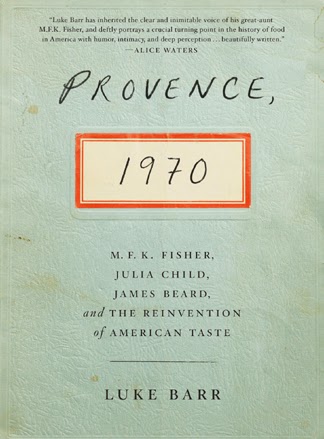
Cooking and Thinking in Provence, 1970


I review a lot of books for my local newspaper. I can’t remember the last one that spoke to me as Provence, 1970 has.

Subitled “M.F.K. Fisher, Julia Child, James Beard, and the Reinvention of American Taste,” the book was written by Luke Barr, an editor at Travel + Leisure and Fisher’s nephew.

(M.F.K. Fisher, in case you haven’t read her, is another great read, perhaps the first American to write culinary essays that were taken seriously by both food lovers and literary critics.)

The book hones in on a few weeks toward the end of 1970 when six food luminaries converged in the South of France. In addition to the three writers in the subtitle, Barr writes about Simone Beck, Julia Child’s friend and the co-author of Child’s pioneering volumes on Mastering the Art of French Cooking; Richard Olney, an American writer and artist who wrote meticulously researched books about traditional French country cooking; and Judith Jones, the influential editor who worked with most of the writers involved.

Jones is the only major character in the book who is still alive. At 89 she is still cooking and writing and is a former judge at my very own hometown’s charity pudding contest, which will return in 2014.

Working from letters, diaries, and memoirs, Barr examines individuals and cultures at a defining moment. Most of his American characters had made their reputations (and built much of their lives) paying tribute to traditional French cuisine. At this point in their lives Child and Fisher in particular were beginning to feel ever so slightly oppressed by the Old World and their old lives in France … and to look forward to a new beginning in the New World.

Barr argues that this moment in food history, the time his characters spent together in Provence late in that year, marked a turning point in the way Americans write about food and consequently in the way we cook. Instead of trying to duplicate classic French modes of food preparation, we began to explore our own culinary possibilities.

Much of the food culture we now take for granted followed—including our renewed interest in local, fresh food; the status of chefs and food writers (although not this food writer yet, alas) as icons of popular culture; our curiosity about new, varied flavors; and what Barr calls the “moral dimension” of cookery in contemporary America.

Barr is careful not to overstate his argument; he doesn’t claim that these encounters in Provence CAUSED the way we cook today. He does convincingly maintain that his characters and their interactions “provide a unique, up-close view of the push and pull of history and personality.”

Provence, 1970 takes the reader on a thought-provoking, delicious tour of a remarkable time, place, and group of people. My favorite moment in the book comes when Julia Child and James Beard are improvising a simple supper in the kitchen at la Pitchoune, the small house built by Child and her husband Paul in rural France.

Julia Child and James Beard at la Pitchoune in December 1970, taken by Paul Child. Used with permission from/courtesy of the Schlesinger Library, Radcliffe Institute, Harvard University
 
For them, as for most of us who love to cook, the preparation of a meal is a balancing act between the knowledge and tradition they have built up over the years in the kitchen and the demands of the unique foodstuffs in front of them. It is an opportunity for creativity and for camaraderie.

I treasure Provence, 1970 for scenes like the one in the Childs’ kitchen and also for its implicit message that change can come at any age. All the main characters are middle aged, ranging from Richard Olney at 43 to James Beard at 67. Yet all are preparing for new chapters in their lives and new chapters in books.

Above all, I love the book for Barr’s sensitivity to the enduring connections that food can forge between people who care for one another and for the preparation and consumption of meals.

His words about his mother near the end of the book speak to the impulse that made me call this blog In Our Grandmothers’ Kitchens.

It was my mother, who died a few years ago, who taught me to cook. And when I make something she made for me, or with me, I feel her presence—not in any literal or even ghostly way, but in the form of an atmospheric shift, an emotional warmth. It is striking how cooking binds us to the past, and to the people we love, even when they’re gone.

As Christmas approaches, I raise a glass and lift a fork to Luke Barr and to the historical figures he brings to life in his book. And of course to my own late mother—and to you and those you love, dear readers.

Taffy and Tinky in 2009
P.S. If you have already purchased Provence, 1970 for a food lover on your list and are looking for other holiday-gift suggestions, a bookstore, Amazon, or I would be more than happy to sell you a copy of my own Pulling Taffy or Pudding Hollow Cookbook. (If you order from me, you may get your copies signed—and you will be supporting THIS middle-aged food writer!)

19 November 2013

The Feast of Love and Hope and Gratitude


This month Americans are observing many anniversaries. Today is the 150th anniversary of Abraham Lincoln’s Gettysburg Address. I long for its eloquence and brevity every time I write—and every time I listen to a political speech.

The 50th anniversary of John F. Kennedy’s assassination in a few days is dominating our television screens now almost as much as it did at the time of that president’s death.

Mulling over it repeatedly, we explore our history, our feelings about our leaders, and the difficulty of ever knowing precisely what happened in the past. (The assassination is an event that has been seen by millions of people and studied by thousands—and yet no one can be 100-percent sure exactly what happened on that day in Dallas.)

The anniversary that interests me most, however, is another Lincoln-related one. In November 1863, a week after writing and reciting the Gettysburg Address, our 16th president led Americans in celebrating our first national day of Thanksgiving.

States and communities had celebrated their own days of Thanksgiving for a couple of centuries by then. It was Lincoln who nationalized the holiday and identified it as the last Thursday in November. (It eventually became the fourth Thursday rather than the last.)

Sarah Josepha Hale

Writer/editor Sarah Josepha Hale had campaigned unsuccessfully by letter for such a day with previous presidents beginning with Zachary Taylor. It took Lincoln’s genius to identify Thanksgiving as a quintessentially American holiday—one that was particularly appropriate to a nation at war.

It is when we are feeling the most stress that we have the greatest need to be grateful. Lincoln realized that a nation at war needed to stop, take stock of its blessings, and express gratitude—perhaps even more than a nation at peace. Indeed, his original proclamation reminded Americans to be particularly mindful of those whose families had been disrupted and/or destroyed by the war.

This spirit lives on in the efforts of a variety of organizations to serve Thanksgiving meals (and bring Thanksgiving cheer) to veterans and their families. It also continues whenever those of us hosting Thanksgiving dinner invite friends, relatives, or strangers to join us for this annual feast of love and hope and gratitude.


You may see Lincoln’s original Thanksgiving proclamation at the National Archives website. And the White House website offers what it calls the “definitive” history of the practice of pardoning a turkey for Thanksgiving. I love the weird American-ness of this tradition; we pardon one turkey a year so that we can feel less guilty about eating millions of its cousins!

I’m not actually posting a Thanksgiving recipe this year—although I refer you to several of them I have posted over the years. Try the hush-puppy pudding … or cranberry upside-down cake … or even simple roasted Brussels sprouts.

Instead I offer this simple seasonal quiche. It uses a vegetable I always overbuy at this time of year, the sweet potato. (I received several with my farm share last week so I was forced to get creative.)

Happy Thanksgiving to you all … and to your families. Don’t forget to open your homes and your hearts to strangers at this time of year.


Sweet Potato Tart

Ingredients:

1 large sweet potato, cut into small pieces and peeled if you want to peel it
extra-virgin olive oil as needed
salt to taste
3 large or 4 medium onions, peeled and thinly sliced
fresh, chopped parsley to taste
four eggs
1/2 cup cream
a dash of Creole seasoning
ounces (more or less) sharp cheddar cheese, grated
1 8-inch pie shell

Instructions:

Preheat the oven to 375 degrees. Pour a tablespoon of oil into a bowl. Stir in salt to taste (start with 1/2 teaspoon). Toss in the pieces of sweet potato.

Place the sweet-potato pieces on a cookie sheet or baking pan, and roast until they are lightly brown around the edges, stirring occasionally. This took me about 1-1/4 hours, but my oven runs cool so it may take you less time.

While the sweet potatoes are cooking, splash oil onto a non-stick frying pan. Place the pan over medium-low heat. Toss in the onion slices.

Cook them slowly, stirring every 5 minutes or so, until they are reduced and softly caramelized. This may take an hour or more. Add a pinch of salt after the first 1/2 hour—and add a little more oil if you need it as you cook. When the onions are finished, stir in the parsley.

Both the onions and the sweet potatoes may be cooked the day before you want to serve your quiche; refrigerate the cooked vegetables until they are needed.

When you are ready to assemble your quiche whisk together the eggs, cream, and Creole seasoning in a bowl.

Place the pie shell in a pie pan. Sprinkle half of the cheese over the pie crust. Top the cheese with the onions and then the sweet potatoes; then pour on the cream/egg custard, and finish with the remaining cheese.

Place the tart (or quiche or whatever you want to call it!) on a rimmed cookie sheet to prevent spillage, and bake it for about 40 minutes, until the custard is set and the top is golden—but the sweet potatoes peeking out are not burning!

Serves 6.

The Tart Halfway Through Assembly

14 October 2013

A Pressing Engagement: Cider and Snickerdoodles


Apples and cider seem to sum up autumn in New England. Bursting with color and flavor, they are doubly precious because they represent the end of the harvest. Winter is coming, and we all know it, but in the meantime we savor the season and its fruit as much as we can.

Last year an ill-time frost made apples scarce here in Massachusetts. This year nature is making up for last year’s dearth with more apples than I can remember seeing in any single fall. An odd tree in my front yard that has never before produced ANYTHING suddenly droops with yellow-pink orbs.

Knowing that I love to make applesauce from a variety of apples, several of my neighbors have invited me to gather fruit from their trees as well as my own. I know that one tree down the road has Gravensteins. Another offers an abundance of Golden Delicious apples. The other trees are mysteries to me. Their fruits vary in color from yellow to such a deep red that the flesh as well as the skin of the apple is imbued with pigment. I don’t care what they’re all called. I just know that I love them!

On Saturday, the actual Columbus Day, the Coopers over on Strawberry Hill here in Hawley hosted their annual cider party. Paul Cooper hauled out his antique cider press, we all brought apples and jugs, and everyone who wanted to went home with fresh-pressed cider. (We also had an opportunity to catch up with neighbors and eat delicious food, but the cider was the main event!)

It can take several people (including advisers!) to press cider. Our host Paul Cooper is in the front right.
This cider is amazingly aromatic, with a deep, rich color that seems even darker than the pretty terrific cider I frequently purchase at local orchards. I am unable to tell you how my own jug of cider tastes; I popped it into the freezer in anticipation of a visit from my brother and his family next weekend. (I’m SUCH a good sister and aunt!)


I can’t really give you a recipe for cider, which just involves pressing apples until they release their lovely juice. (The press looks like a medieval instrument of torture, but it works!) So I’m sharing the recipe for the cookies I brought to Leslie and Paul Cooper’s party, snickerdoodles. Their cinnamony goodness is an ideal accompaniment to fresh-pressed cider.

The recipe came originally from Maureen Schaden-Foster, whose family runs the End of the Commons General Store in Mesopotamia, Ohio. Amish families drive up to the store in buggies to buy nourishing basics, and the store also delivers to several hundred Amish families nearby.

It’s one of the very few cookie recipes I make that call for vegetable shortening instead of butter. You’re welcome to try making it with butter, but I have to warn you that only shortening gives you the dreamy, melt-in-your-mouth consistency a snickerdoodle should have.

Speaking of that consistency, please note that you should really eat these cookies within 24 hours. After that they get a little stale and lose some of their appeal.

So haul out the cider and invite friends over to enjoy this bittersweet season with you.


Amish Snickerdoodles

Ingredients:

2-3/4 cups flour
2 teaspoons cream of tartar
1 teaspoon baking soda
1/2 teaspoon salt
1 cup shortening, softened
1-1/2 cups plus 2 tablespoons sugar
2 large eggs
2 teaspoons cinnamon

Instructions:

Sift together the flour, cream of tartar, baking soda, and salt. Set aside. Cream the shortening, and cream in the 1-1/2 cups sugar. Add the eggs and beat well. Gradually stir the flour mixture into the shortening mixture. Chill the dough for at least 2 hours. (It will have pastry-like consistency; pat it together a bit before chilling.)

When the dough has chilled, preheat the oven to 400 degrees. Combine the 2 tablespoons of sugar with the cinnamon in a small, shallow dish or bowl. Shape the dough into balls the size of walnuts, and roll each ball in the sugar-cinnamon mixture. Bake on ungreased cookie sheets for 8 to 10 minutes. The cookies should be lightly browned but still soft.

Yield: About 4 dozen snickerdoodles.

16 September 2013

Connie’s Salade Niçoise

Connie's Photo of Her Salade

Summer is almost over—but we’re still surrounded by much of its lovely produce. This classic salad recipe comes from my friend Connie MacDonald via her sister Amy. (Thank you, Connie and Amy!)

Connie’s instructions call for tossing the entire salad together. When I made it I had fewer people than it serves so I ended up plating all the ingredients separately and letting my guests help themselves. That way, the leftovers could be combined again the next day.

However you mix it, the salad gives you a lovely way to say farewell to summer’s bounty. And it gives me a delicious way to remember my late mother, who adored Salade Niçoise.

She always included a little hard-boiled egg in her Salade so I did so as well (as you can see in the photo of my version). It’s not obligatory, however!

Salade Niçoise à la Constance

Ingredients:

for the salad:

8 small red potatoes
1-1/2 pounds French (or any good, fresh) green beans
1 cup Greek olives
1/2 red onion
1 pint cherry tomatoes
a couple of big handsful of Mesclun greens (3 to 4 cups)
about 1 pound tuna—canned, in packets, or fresh (if it’s fresh you should obviously quickly cook it before using it!)

for the Lemon Vinaigrette (more or less to your taste)

1/4 cup freshly squeezed lemon juice
1/2 cup olive oil
2 teaspoons salt
2 teaspoons pepper
2 teaspoons garlic powder (Tinky used 1 fresh garlic clove, minced)
1 teaspoon Dijon mustard

Instructions:

Boil the potatoes. While they are cooking to al dente, steam green beans. Set aside to cool to room temperature.

Dice the olives and onion. Set them aside separately.

Whisk together the vinaigrette.

Wash the tomatoes and the salad greens and set them aside. “By this point,” says Connie, “your counter top looks like an awesome Provençal cooking show with many bowls full of colorful veggies. You can practically feel your hair grow in anticipation of the impending nutritive boost.”

When the potatoes are cooked, drain them and let them cool until you can safely handle them. Slice them into 1/4-inch-thick slices and toss the warm potatoes with half of the vinaigrette. (I, Tinky, had the tiniest potatoes in the world so many of them didn’t need slicing.)

Find a really big bowl, toss and mix in all the ingredients, and cover them with the remaining vinaigrette. Toss gently, but thoroughly.

Turn the salad out onto a large platter and serve with fresh croissants.

“T.D.F. (to die for),” says Connie. The girl has a point. Serves 8 to 10 generously.

A Plate with My Unmixed Version of the Salade

Finally … in case you’re not among those I have inundated with the links to my latest TV appearance, here they are! On Friday I made two dishes on the program “Mass Appeal” for World Alzheimer’s Month: Broccoli and Apple Salad and Apple Crumble.

03 September 2013

Happy Anniversary to Me!


Or rather to this blog. And to its faithful readers.

On September 3, 2008, In Our Grandmothers’ Kitchens first appeared on the internet. I thought the blog might serve as my passport to fame.

It hasn’t quite done that …. yet. It has attracted a moderate following, however, and it has given me a forum in which to develop some of my favorite ideas and recipes.

My most popular posts have been the ones about TV and Film History (particularly anything to do with “I Love Lucy”!), followed by those that dwell on two of my favorite foods, rhubarb and asparagus.

In the coming year, I hope to use some of my blog posts in my next book. And I hope my audience will continue to grow. Please let me know what you like about the blog, what you don’t like, and what you’d like to see me do!

In case you haven’t been following me from the start, I’m reprinting my very first post here. I hope to make the tasty scones again today—and to contemplate the universe, something we all need to do from time to time.

As I contemplate, I’ll enjoy this (almost) autumnal anniversary. It’s fitting that the Jewish New Year falls in September, a month in which it seems natural to look both backward and forward. Thank you all for reading….

Posted on 3 September 2008:

Apples and the Universe

Photo Courtesy of Susan Hagen

If you wish to make an apple pie from scratch, you must first invent the universe.

So said the late astronomer Carl Sagan on the PBS television series Cosmos.

Sagan was one of the great writers of popular science for a reason. He knew how to phrase complicated truths about human existence in down-to-earth ways.

To him, of course, the important noun in his sentence was the universe. To me (because I’m an ordinary person and a cook), it’s the apple pie.

I love to cook—but I can’t imagine how anyone ever invented our most basic recipes: a simple cake, a loaf of bread, a scrambled egg, a pie.

To my mind those breakthroughs are as mystifying as thinking up relativity or quantum theory. I’m glad I don’t have to come up with them myself. I’m content with tweaking traditional folk recipes and asking my neighbors to share the formulas for their own culinary triumphs.

Nevertheless, I do know that very time we cook or bake we’re using science and recreating the universe in numerous ways. Even though I managed to avoid taking chemistry in high school and college, I use its magical processes every day to create meals for family and friends.

When I follow a recipe or consider a specific food, the neurons (or whatever the heck does the work) in my brain conjure up the person who first introduced me to that flavor. And of course when cooking I create something new out of unrelated matter—my own personal big bang.

(I’ve had a few little bangs in the kitchen as well, but that’s another topic.)

Apples are all around us at this time of year, embodying the coming autumn with that season’s key characteristics. They are cool. They are colorful. They are crisp.

Looking down at us from trees or up at us from a basket, they evoke wonder and laughter, just like the universe. They are comforting, nutritious, and versatile—capable of waxing sweet or sour (again like the universe), depending on their use.

My dog finds them on the road and uses them as balls, illustrating gravity (wouldn’t that old apple lover Isaac Newton be proud?) by propelling them down the street and running to retrieve them.

I’ll be posting some apple recipes here as time goes by. Luckily, none of them actually takes 13 billion years to make—unless you, like Sagan, like to consider the very, very big picture.


Tinky's Apple Scones

This simple recipe never fails to please. I made it almost weekly when I worked as the demo cook at Bloomingdale’s in Tysons Corner, Virginia. It’s also delightful with dried cranberries instead of the apple.

Ingredients:

1/2 cup sugar plus a bit more as needed for sprinkling
2 cups flour
1-1/2 teaspoons baking powder
1 teaspoon baking soda
1/2 teaspoon salt
1 teaspoon cinnamon
1/2 cup (1 stick) sweet butter
2/3 cup cut-up apple (about 1 medium apple—use a bit more if you like)
1 egg
2/3 cup buttermilk
1 teaspoon vanilla

Instructions:

Preheat the oven to 350 degrees and grease 2 baking sheets. Combine the sugar, flour, baking powder, baking soda, salt, and cinnamon. Cut in the butter, but be careful not to overmix. Stir the apple pieces into this mixture.

In a separate bowl, combine the egg, buttermilk, and vanilla. Add the apple mixture and blend briefly. Drop the batter in clumps onto the baking sheets. You may either make large scones (you’ll end up with 6 to 8 of them) or smallish ones (12 to 16).

Sprinkle additional sugar on top for added flavor and crunch. Bake for 18 to 25 minutes. Makes 6 to 16 scones, depending on size.

28 August 2013

Celebrating the March on Washington

Today in honor of the March on Washington’s 50th anniversary I cooked a couple of appropriate recipes on the television program "Mass Appeal." I post the videos below.

You may see the full recipes elsewhere on this very blog. I originally made the black-eyed peas to remember the television program “Amos and Andy.”

And the pound cake, which may be made with blueberries as well as peaches, appears here.

Happy viewing!


22 August 2013

Kritters!


Most of us up here in Yankeeland have very few opportunities to eat fresh okra since this vegetable prefers temperatures above 70 degrees Fahrenheit. It has begun creeping into farm stands just south of me in the Connecticut Valley in the last couple of years. The Valley is sunny and warm (well, warm for New England!).

I purchase okra at the Bars Farmstand in Deerfield, Massachusetts. Although it’s a bit of a drive for me, I love the Bars Farm. It has the most extensive variety of sweet and hot peppers anywhere around. And like many other local farms it practices integrated pest management; its owners are responsible stewards of their land.

Many people object to the “slime” component of okra. I have found that when it is fried it doesn’t emit much slime. My friend Michael Collins grills it, and I hope to try that method soon. Meanwhile, here I share the recipe for the okra fritters (a.k.a. kritters) I have made twice now.

The size of the kritter depends on your taste. The kritters are crunchier (and of course more fattening) if you cut the okra into tiny pieces—say, 1/3 inch long. When I made them earlier this week, I just cut each piece of okra in half after snipping off the ends. This method results in a little more okra flavor.

Either way you make them, you will doubtless convert non-okra lovers with these treats.

Okra Fritters

Ingredients:

10 pieces of okra, with the ends trimmed off, sliced either in half or into several smaller pieces
enough buttermilk to cover the okra
1/2 cup cornmeal (this is approximate; just dump some cornmeal into a bowl)
2 tablespoons flour (ditto)
2 teaspoons Creole seasoning
canola oil as needed for frying
salt (if needed)

Instructions:

Wash and dry the okra. Place it in a bowl, and cover it with buttermilk.

In a flat bowl, whisk together the cornmeal, flour, and Creole seasoning. Dip each damp piece of okra in this mixture.

Cover the bottom of a heavy skillet with oil. Heat the skillet until the oil is quite hot. Quickly fry the okra pieces in the oil, turning once.

Remove the okra pieces to a paper-towel-covered plate. Taste one. (Try to stick to ONLY one!) If the kritters need salt, sprinkle a little on top.

Serves 2 copiously as an appetizer or side dish.


17 July 2013

Grad's Pantry Pasta


My friend Grad in Savannah sent me this recipe months ago, but somehow or other it took me a while to make it. She says she always has the ingredients in her pantry. Unfortunately, they weren’t all in mine. The pasta was particularly hard to find. I tried numerous local grocery stores and finally gave up and ordered bucatini from Amazon.com.

Bucatini are long, thick strands of pasta that are slightly hollow inside—sort of like lengths of thick pipe. They hold their shape beautifully in the sauce. The word “buco” means hole in Italian; hence the name. Bucatini will be a staple of my pantry from now on.

Here’s what Grad had to say about her dish:

This is one of those things my eldest son loved so much when I made it years ago, he now makes it himself, adding what he has on hand. Rather than a recipe, I think of it more a road map that allows side trips. Leftover shrimp? In it goes. Clam juice? Why not? A little bit of chicken broth left over from yesterday? Absolutely. How about that leftover asparagus? Or those little cherry tomatoes you want to use? You get my drift. As far as I’m concerned, as long as you have the anchovies, artichokes, sun dried tomatoes, pepper flakes, olive oil and perciatelli (or bucatini) you can’t go wrong.

I hope you make this dish. It is even better the next day and I love it cold! Keep the basic ingredients in your pantry (along with a nice bottle of red wine) and you are ready for any foodie emergency—or for when you need a hug.

My minor additions (bell pepper and fresh asparagus) are noted below. With asparagus season over, I think I’ll try the pasta next time with a little sautéed zucchini and some tiny tomatoes. And broccoli would be divine in the fall. After all, we need hugs in many seasons….


Ingredients:

1 lb. bucatini or perciatelli (if both are available, Grad prefers the the bucatini, but either will do)
salt to taste
1/4 cup extra virgin olive oil
1 small onion, diced
6 peeled garlic cloves, minced (or more)
1 red or yellow bell pepper, diced (added by Tinky)
1 teaspoon hot red pepper flakes, or more if you like things hot
3 to 4 flat anchovies packed in oil (I chopped these up)
1 6-ounce. jar marinated artichoke hearts
1 4-ounce jar sun dried tomatoes in oil
1-1/2 cups blanched asparagus pieces (added by Tinky)
2 tablespoons of oil from the tomatoes
Parmigiana-Reggino or Grana Padano cheese to taste

Instructions:

Put the pasta on to boil in boiling, salted water. Meanwhile, place the olive oil in a large skillet. Saute the onion gently until soft. Add the garlic and bell pepper; cook gently until they soften as well. Try not to brown the garlic.

Add the anchovies and cook gently until they disappear into the other ingredients. Sprinkle in the pepper flakes and heat them for a minute or so. Drain the artichokes, reserving the marinade. Slice them thickly, and add them to the skillet. Slice the sun dried tomatoes into thin strips, and add them to the skillet with 2 tablespoons of the oil in which they were packed. Cook gently. Stir in the asparagus pieces. Taste and sprinkle with a little salt if needed. (I just waited and added salt at the table since people like differing degrees of saltniness.)

Add a little of the artichoke marinade to the mixture. Taste and correct seasonings. Add 1 cup of the pasta cooking water, and bring the mixture to a boil to reduce it slightly. (At this point, Grad sometimes adds 1/2 cup of bottled clam juice or chicken broth. They are not essential, however.) When the pasta is al dente, take it out of the water with a pasta fork and add it to the skillet to finish cooking. Toss everything together with tongs. If it is needed, add a little pasta water one ladle at a time, tossing between additions, until the mixture is a nice saucy consistency. Take the pasta mixture off the heat, and sprinkle cheese on top.

Serves 4 to 6.

If you look closely at the pasta at the front of this picture, you'll see the little hole inside.


18 June 2013

Sue's Meatloaf (and an Announcement!)

Sue Haas

Longtime blog reader Sue Haas of Seattle wrote several months ago to share her meatloaf recipe—but somehow or other I didn’t manage to make her loaf until a few nights ago. A friend who was coming to dinner requested something in the nature of comfort food to dispel the gloom of the weather (lots and lots of rain!). So I pulled out Sue’s recipe.

My local general store doesn’t sell veal so I used 1 pound of lean ground beef and 1/2 pound of pork. The only other changes I made (and they were minor, including the use of fresh instead of dried oregano) are noted in the recipe.

This meatloaf is tender and very flavorful. I particularly enjoyed the fresh herbs; I might throw in even more of them another time and leave the spices on the rack until winter.

By the way, in case I haven’t already bombarded you with this information, I do want to mention that my book Pulling Taffy will officially come out this Sunday and may be ordered right now from its website. (The website will also help you find the eBook and audiobook!)

In addition to talking about my final year with my mother and sharing family stories and thoughts, the book features a number of recipes—many of them from this very blog! Please consider supporting me by purchasing the book.

My mother would be celebrating this week!

And now, on to Sue’s recipe……

Sue’s Meatloaf

Ingredients:

1-1/2 pounds meatloaf mixture (1/3 lean ground beef, 1/3 ground veal, 1/3 ground pork)
1 cup fresh breadcrumbs (I used my maple oatmeal bread, which makes great crumbs)
2 tablespoons milk
1 egg, beaten
1 small onion, finely chopped (or half of a large onion)
1 to 2 garlic cloves (according to your taste), minced
1/2 cup fresh parsley, chopped
1/4 cup fresh sage, chopped
1 teaspoon dried oregano (I used 2 teaspoons fresh since that’s what I had)
1 teaspoon ground cumin
1/2 teaspoon (sweet smoked) paprika (or regular)
1-1/2 teaspoons fine sea salt
1 teaspoon ground black pepper
1 tablespoon Worcestershire sauce
1/4 cup ketchup

Instructions:

Preheat the oven to 350 degrees.

Place the meat mixture in a food processor and pulse a bit for a finer grind. Transfer it to a large bowl. Add the remaining ingredients. Mix with hands.

Put the mixture into a 9-x-5 inch loaf pan and pat into loaf shape. (I used a regular baking pan and shaped a free-form loaf.)

Bake for about 1 hour, or until the center of the meat reaches 170 degrees on a meat thermometer. (I covered the loaf for the first half hour and then uncovered it to finish cooking.)

Serve with ketchup, if desired. Serves 6.

02 June 2013

MRKT Restaurant Scallops


Josean Jimenez discovered that he loved food and cooking when he was a child. “Pretty early on when my parents would throw parties, I realized I’d rather be in the kitchen than anywhere else. The kitchen is usually where everybody gathers,” he told me in a recent interview.

Jimenez and I were sitting at a table near the large front windows of his MRKT Restaurant on Elm Street in South Deerfield, Massachusetts. Photographer Paul Franz and I nibbled on one of Jimenez’s beloved small plates while the chef told us about his life and his passion for cooking. (Unfortunately, Paul’s lovely photos ended up in the local newspaper; blog readers are stuck with mine!)

Born in Puerto Rico, Jiminez grew up in Northampton, Massachusetts. Cooking classes he took in junior high school “sparked” his culinary abilities. He went on to study culinary arts at Smith Vocational High School and the Connecticut Culinary Institute.

He worked his way up from dishwashing and prepping ingredients to chef at a number of Pioneer Valley Restaurants. The young chef ventured east to Martha’s Vineyard and Boston, but found that our valley in Western Massachusetts called him back.

During his early years working for others Jimenez expanded his early interest in “multi-Spanish/Puerto-Rican/Creole food” to embrace a wide variety of cuisines. He also learned to manage restaurants as well as cook in them.

Last year he decided he was ready to set out on his own and began looking for a restaurant in the Pioneer Valley. The location in South Deerfield, which had been a restaurant for many years and needed few alterations, suited him perfectly. It was manageable in size and attractive.

More importantly, it represented only a 15-minute drive from the home in Chicopee he shares with his wife and their lively three-year-old twin sons, whom Jimenez obviously adores—although he also obviously finds them a handful.

Each boy has a name tattooed on one of the proud papa’s arms. I asked him what he would do if he had more children since he didn’t have any more arms. Jimenez looked alarmed. “This is all we’re planning,” he said. “Some days when they come in to the restaurant, we have a lot of cleaning up to do!”

MRKT Restaurant opened in November. The winter months were long in the new restaurant, but business is brisk now that spring has arrived. Jimenez hopes to expand his hours (currently Tuesday through Sunday from 5 to 10 p.m.) to include lunch very soon. He is also planning international nights with guest chefs.

Jimenez’s own cooking philosophy at MRKT reflects the value he has come to place on the contributions of area farms and their produce. “It’s farm to table with international flare,” Jimenez said of his menu. “I’m trying to support local agriculture. The food tastes better when it’s not coming in a truck from California.”

Jimenez noted that the farm-to-table emphasis also suits his culinary temperament since he likes to alter his menu frequently. Responding to the growing season makes changes inevitable.

“We’ve had the current menu for maybe four weeks and I’m ready to change it,” he said with a smile.

However much the menu may vary, it will probably always feature small plates, which Jimenez likes to offer so that diners can share and taste as many food combinations as possible.

The small plates on the menu when I visited included Hadley asparagus with goat-cheese fondue and a fried egg (the chef is very fond of eggs); chicken liver mousse with homemade jam, pickled mustard seed, and grilled toast; and the dish Jimenez served Paul Franz and me, sea scallops with a vegetable ragout and a carrot-cardamom reduction.

The orange of the carrot reduction and the green of the peas and beans shouted “spring,” and the dish provided contrasting consistencies to the palate: creamy sauce, tenderly chewy scallops, crunchy chives.

We forked the scallops and vegetables down quickly and then asked Josean Jimenez for a spoon so we could savor every drop of the carrot reduction.

I plan to make this dish soon. It’s quick, easy, flavorful, and just a bit showy. (I do love showy!)


MRKT Restaurant’s Pan-Seared New Bedford Scallops with Fava Bean/English Pea Ragout and Carrot-Cardamom Reduction

Ingredients:

for the reduction:

1 cup carrot juice (Josean Jimenez makes this with a juicer, but it may also be purchased)
1 cardamom pod, lightly crushed by hand
1/2 cup cream
salt and pepper to taste

for the scallops:

salt and pepper to taste
4 large scallops
a splash of canola oil
1 teaspoon butter

for the ragout:

a splash of canola oil
1 tiny red onion, finely chopped
1/4 cup fava beans, blanched
1/4 cup English peas, blanched
1/4 cup vegetable stock
1 teaspoon butter
sea salt and pepper to taste (Josean Jimenez prefers the French “piment d’espelette,” available in gourmet stores, but other ground pepper may be substituted)
1 tablespoon finely chopped chives plus additional chives for garnish

Instructions:

First, prepare the reduction. In a saucepan combine the carrot juice and cardamom pod. Bring the mixture to a boil and simmer until it reduces by half (about 5 to 10 minutes). Stir in the cream, and again reduce by about half, or until slightly thick (about 5 minutes more).

Remove the reduction from the heat, add salt and pepper, and set aside. Move on to the scallops.

Sprinkle salt and pepper over the scallops. In a small sauté pan heat a splash of canola oil. Sear the scallops over medium high heat until they are golden brown on both sides (around 2 to 5 minutes, depending on your stove). Add the teaspoon of butter just as they are about to finish cooking.

In another small sauté pan heat another splash of canola oil for the ragout. Sauté the red onion pieces briefly; then add the beans and peas. Sauté over medium heat for 1 minute.

Add the vegetable stock, and cook for another minute. Toss in the butter when the stock is almost finished cooking. Season the ragout with the salt and pepper, and add the tablespoon of chives.

To serve the dish, ladle 1 ounce of the carrot sauce into a flat bowl. (You will have enough leftover sauce for several future servings.) Pour the vegetable ragout on top of the sauce, and place the scallops on top. Sprinkle chives on top and serve.

Makes 1 serving.

13 May 2013

Handy Dandy Lion

This photo has very little to do with the recipe, but it does shout "spring"!

My family is not a gardening family. For years my mother and I tried to plant vegetables in our yard, dreaming optimistically of running out and picking something for supper and cooking it mere minutes after it left the garden.

Even when we managed to keep the plants fertilized and weeded (and I admit that we seldom did!) the results were dire. Bugs and rabbits consumed more produce than we did, and our vegetables came up spare and blemished when they came up at all.

There are some people who are destined to buy their food. I am one of them.

I still manage to eat fresh fruit and vegetables throughout the growing season by belonging to a CSA and frequenting local farmstands and farmers markets. On Friday, however, I discovered one edible plant I have NO TROUBLE growing.

David Rich, the neighbor who cuts my lawn, finished the first mowing of the year and appeared at my door. “I left you the dandelions by your herb bed,” he said. “I thought you might want to eat the greens.”


I was perplexed. I don’t hate dandelions the way some people do, and I certainly wouldn’t poison the grass to get rid of them. It had never occurred to me to eat them, however. Still, I’m always ready to try something new. And goodness only knows I had plenty of dandelions with which to experiment.

Dave suggested cutting the greens carefully with scissors to minimize the grass I would pick with them. (I still ended up with some grass, but I managed to separate it out while soaking the greens.)

He told me that he and his wife Sally like to cook the greens as they do spinach, by steaming them and adding just a bit of butter.

My favorite way of cooking spinach (aside from making it into a salad) is to sauté it with a little olive oil and garlic so I opted for that method.

When I looked up eating dandelion greens on the internet, I saw a recipe for dandelion-green salad with walnut oil. Since I had some walnut oil in the house (I have been using it for salad dressing lately), I decided to add a bit to my cooked greens. I didn’t use it to cook them since walnut oil has a low smoking point.

If I had had some walnuts to toast, I would have popped them on top, but I am out of walnuts.

Even without the walnuts, my neighbors the Gillans (who helped taste) and I agreed that the dish was delectable. The greens had a hint of bitterness, but the walnut oil smoothed it out.

My dandelions are flowering fast, but I’m sure I’ll get in another cooking session before they get too old. Meanwhile, I am happy to have found that I have a knack for growing SOMETHING I can eat—and something I can feel virtuous eating: dandelion greens are chock full of vitamins and minerals.


Sautéed Dandelion Greens

Ingredients:

1 large bunch dandelion greens (cut when they are young and tender, BEFORE the flowers come out)
a small amount of olive oil (start with 1 to 2 teaspoons and add a little more if needed)
1 clove garlic, cut into very thin strips
salt to taste
a good dollop of walnut oil
a few toasted walnuts (optional)

Instructions:

Soak the greens in cold water for a few minutes. While they are soaking remove any grass stalks that are attached to them. Place them in a colander to drain, but do not shake them dry; they should still be slightly damp when you cook them.

In a 12-inch sauté pan warm the olive oil over medium-high heat. Sauté the garlic pieces until they begin to turn golden brown.

Toss in the greens (they will sizzle a little because they are wet). Sauté them with the garlic just until they wilt. This is a rapid process.

Toss on salt to taste. Transfer the vegetables to a medium bowl, and add the walnut oil. Toss. Serve immediately, garnishing with the walnuts if you have them.

Serves 1 to 2.