20 December 2011

Cranberry Delight

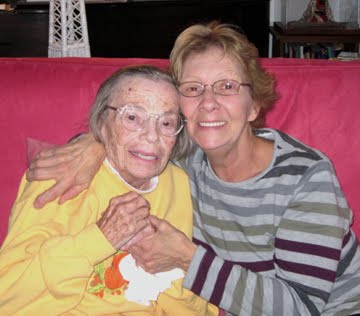
Things have been very busy in our household, not entirely in a good way. My mother (who appears with me on the masthead of this blog) passed away just after a week ago, followed by the cat. Both were very old, and both died very peacefully. Nevertheless, the house is startlingly quiet, and I have a bit too much to do.

Consequently I am DEFINITELY in the mood for a little Christmas cheer … and this recipe fits the bill. I love cranberries. The idea for making ice cream with them came to me in a dream. I need more dreams like this one!

My family tried the recipe over Thanksgiving, not on Thanksgiving Day (because my relatives are fixated on pie on Thanksgiving) but later in the weekend.

My nephew Michael was not at all sure he really wanted to churn ice cream, but we had no choice. My electric ice-cream maker was missing a critical part so we got out the old hand cranker.

It took a while … but even Michael decided that the result was more than worthwhile. I do not exaggerate when I say that moans filled the room as we ate.

In fact, this is one of the last treats my mother enjoyed.

Feel free to experiment with the recipe. I almost added a little orange rind to the mixture. I’m not sure the ice cream could taste any better than it did, however.

Merry Christmas to all!


Cranberry Swirl Ice Cream

Ingredients:

for the ice cream:


1-1/2 cups milk
4 egg yolks
2/3 cups sugar
1-1/2 cups heavy cream
2 teaspoons vanilla
1 pinch salt

for the cranberry swirl:

1 cup water
1 cup sugar
12 ounces cranberries

Instructions:

First, make your ice-cream base. Heat the milk until it is steamy but not boiling. In a separate bowl, whisk together the egg yolks and sugar until the mixture is thick and light yellow (about 4 minutes).

Whisk a bit of the hot milk into the egg mixture. Then whisk more, up to about 1/2 or 3/4 cup. Whisk the milky egg yolks into the remaining milk.

Cook over medium heat until the custard begins to thicken but does not boil (about 2 to 3 minutes on my gas stove!).

Remove the custard from the heat, and strain it into a heatproof bowl or pot. Cool thoroughly.

As it starts to cool make the cranberry sauce. (It’s basically jellied cranberry sauce, but avoid using the canned stuff if possible.)

In a medium saucepan combine the water and sugar and bring them to a boil. Add the cranberries, and return the mixture to a boil. Reduce the heat, and boil the sauce for 10 more minutes. (If it gets too fuzzy, add a tiny bit of butter.)

Remove the sauce from the heat, and push it through a stainless-steel strainer. You’ll end up with about 1-1/2 cups of sauce and a small amount of solid matter; you may discard the latter.

Cool the sauce, covered, at room temperature; then refrigerate it until you are ready to make the ice cream.

When that time comes, use a mixer or whisk to break up the jellied cranberry sauce into a thick liquid (instead of a solid). Measure out 1 cup. You may reserve the rest to put on top of your ice cream if you want extra cranberry flavor.

Go back to your ice-cream base and whisk in the cream, vanilla, and salt. Place this mixture in your ice-cream freezer and begin the churning process.

When the ice cream looks about ready, add the cup of cranberry sauce and continue churning just until you have a pleasing swirled effect. Serve immediately.

This recipe makes a little more than a quart of ice cream.


By the way, if you find yourself in need of my Pudding Hollow Cookbook to give as a Christmas gift (or to use yourself over Christmas), never fear: copies are DEFINITELY available. If you order by Wednesday noon and live in the continental U.S., the book should arrive by December 24. To order, click here.

02 December 2011

Country Ham and Potato Soup

Fall calls out for hearty soups, and they don’t come much heartier than this one! I know, I know, "hearty" is a code word for fattening, but I served it to company so I didn't have to sip it all myself.

My mother’s dear caregiver Pam gave me the recipe when she saw that I had leftover ham in the house, along with leeks and potatoes from our farm share.

Pam explained that she made the soup frequently when she cooked in the cafeteria at the local high school, where our friend Vicky worked as a baker.

One day Vicky tried the soup. She immediately asked, “Pam, will you marry me?”

It may not make you propose marriage—but it will certainly warm you up … and fill you up as well.

Ingredients:

3 cups diced potatoes
5 slices bacon
3 leeks (mostly white part), cleaned and diced
2 tablespoons flour
1 quart warmed chicken broth
2 cups chopped ham
pepper to taste
1 cup milk
cream to taste

Instructions:

In lightly salted water bring the potato pieces to a boil. Reduce the heat and simmer the potatoes for 10 minutes. Leave them in the water while you prepare the bacon.

In a heavy Dutch oven fry the bacon until it is crispy and brown. Remove the bacon pieces from the pan and set them aside. Remove all but 2 tablespoons of the bacon fat, reserving the remaining fat as well.

Use the bacon fat in the pan to sauté the leek pieces until they soften.

Push the leeks to the side of the pan and add 2 to 3 additional tablespoons of bacon fat. Whisk the flour into this fat to make a roux. Whisk for at least a minute or two to let the fat and the flour combine.

Gradually stir in the chicken stock; then stir in the ham, the potatoes, and 1 cup of the potato water. (You may discard the remaining potato water now.)

Bring the mixture to a boil. Reduce the heat and simmer, covered, for 1/2 hour. Add the milk and a little cream to thin and lighten the soup.

Serve with the bacon (crumbled) as a garnish. Serves 6.

23 November 2011

Rose's Yankee Cornbread

Rose Kiablick of Buckland, Massachusetts, comes every week as a hospice volunteer to spend time with my mother. Rose is a warm hearted great-grandmother … and a wonderful cook. This cornbread recipe, sweetened with local maple syrup, is one of her favorites. It accompanies almost any dish—particularly turkey!

I used a well seasoned Lodge cast-iron corn-stick pan from the Lamson & Goodnow factory store in Shelburne Falls, Massachusetts, to try Rose’s recipe. (I had enough batter left to make a small round cornbread loaf as well.)

I loved the corn sticks; they were moist on the inside and crunchy on the outside. You may of course use an 8- or 9-inch square pan or a larger iron skillet as well. Timing will vary depending on what you use. The corn sticks took about 18 minutes; a larger pan could take up to 25.

If you want to make cornbread stuffing, make this bread TODAY and use it as your stuffing base tomorrow.

Happy Thanksgiving, all….

The Cornbread

Ingredients:

1-1/2 cups flour
1 cup cornmeal
3 tablespoons sugar
2-1/4 teaspoons baking powder
3/4 teaspoon salt
1 cup milk
4 tablespoons (1/2 stick) butter, melted
2 eggs
1/2 cup maple syrup

Instructions:

Actually, Rose just stirs everything together all at once, but I decided to separate the dry ingredients from the wet. Here is my method:

Preheat the oven to 425 degrees. Lightly grease the pan(s) of your choice.

In a bowl combine the flour, cornmeal, sugar, baking powder, and salt.

In another bowl combine the milk and butter; then whisk in the eggs, followed by the maple syrup. Stir this mixture lightly into the dry ingredients.

If you are using a cast-iron pan, pop it into the preheated oven for 5 minutes; then carefully remove it and spoon in the batter. (If you’re not using cast iron, just spoon the batter into the greased pan.)

Bake until the cornbread passes the toothpick test, about 20 to 25 minutes. Serves 8 to 10.

21 November 2011

Scrooge No More

For much of my life I felt like the Scrooge of Thanksgiving. The holiday and its table left me cold.

I didn’t really see Thanksgiving’s appeal. The idea of setting aside a day to give thanks struck me as wonderful in theory. In practice, however, I saw Thanksgiving dinner as a heavy meal with too many dishes, few of which I savored.

One problem was the turkey. I’m just not a turkey girl. Even if I brine the darn thing and it’s super moist, it fails to tempt me (although I LOVE the leftovers!).

Another problem was the bustle in the kitchen, which made me feel ever so slightly claustrophobic.

If I absolutely had to go to family members’ or friends’ houses—if not doing so would hurt their feelings, that is—I would quietly join the eating throng. I would even contribute to the menu.

Whenever possible, however, I spent the day on my own—writing, going to the movies (theaters are NEVER crowded on Thanksgiving!), catching up on reading.

And I eschewed turkey when I could. I still fondly recall my long-ago Chinese take-out Thanksgiving. And eating chicken-fried steak on the fourth Thursday in November one year with friends at Threadgill’s in Austin, Texas, was one of the culinary highlights of my life.

I guess I must be growing older because for the past few years I have actually enjoyed the hubbub of this holiday.

It began, I think, one year when my friends Esther and Mac brought most of Thanksgiving dinner to my house. My family was away … so all I had to worry about was making a couple of dishes and enjoying the company of good friends.

Slowly I worked my way back to family Thanksgivings—and to cooking on Thanksgiving. This year is one of those in which I am in charge of the big meal.

I’m a teensy bit ruthless when my kitchen is THE Thanksgiving kitchen. I have clamped down a bit on my family members’ desire to eat every odd food they ever enjoyed at any Thanksgiving in the course of their lives.

Everyone gets to select one dish that has special meaning. (Sometimes the youngest generation is allowed two choices.) We try ONE new thing. And we prepare as much as we can in advance. We end up with a table that has plenty of variety without being overwhelming.

Not overdoing the food gives us a chance to enjoy the company we’re keeping. Amazingly, when I’m not exhausted from cooking I find that I actually like my relatives and want to cook and eat with them.

I even manage to find time to give thanks!

Today and Wednesday I’ll be offering a couple of easy dishes that might suit readers’ Thanksgiving tables. If you’re too busy cooking to read them now, fear not: you may serve them any time during the cooler months.

The first comes from my mother’s loving, cheerful aide, Pam Gerry.


Pam’s Traveling Spinach and Artichoke Dip

Pam brings this appetizer every year to her family’s Thanksgiving celebration. The recipe has proven so popular among her relatives that it has traveled to a number of states up and down the east coast.

It’s easy to prepare in advance. I actually made it last week and divided the mixture in half before adding the final breadcrumbs and cheese. I added them to one portion and cooked it, serving it to guests. I froze the other half to heat and serve on Thanksgiving.

If you’re worried that an appetizer might be too much with your turkey dinner, do what my neighbors the Parkers do: have an appetizer/dessert meal the night AFTER Thanksgiving so the family can enjoy the extras without worrying about saving room for turkey!

Ingredients:

1 small onion, finely chopped
6 large cloves garlic, minced
a tiny bit of extra-virgin olive oil (and/or butter) as needed for frying
1 10-ounce package frozen spinach, thawed and squeezed to get the water out
1 14-ounce can artichoke hearts, drained
1 cup grated Parmesan and/or Romano cheese, plus 4 tablespoons later
2 tablespoons lemon juice
1/2 cup mayonnaise
1 8-ounce brick cream cheese (light cream cheese is fine), softened
1/4 cup bread crumbs (I used panko crumbs)

Instructions:

Preheat the oven to 375 degrees.

In a small frying pan sauté the onion and garlic pieces in the oil and/or butter until the vegetables soften.

In a food processor, combine the spinach and artichoke hearts. Pulse to make them very small. Add the cup of cheese, lemon juice, mayonnaise, cream cheese, and sautéed vegetables. Pulse again to combine thoroughly.

If you don’t have a food processor, chop the artichoke hearts well before beating them together with the rest of the ingredients.

Place the mixture in a 2-quart baking dish. Sprinkle the top with the bread crumbs and remaining cheese.

Bake until the dip is brown around the edges, about 20 minutes. Serve with chips, sliced vegetables, or bread.

Makes about 4 cups.


05 November 2011

Cider Time

Most New Englanders see early November as a time for winding down from summer and harvest activities. The leaves dwindle, the air takes on a distinct chill, and farm stands begin closing their doors.

For cider lovers, however, this season is a highlight of the year.

Here in Franklin County, Massachusetts, we are lucky to have a weekend devoted to the joys of apples and cider, a weekend that seems to become richer each year.

Today and tomorrow mark the 17th annual occurrence of Cider Days, a celebration founded by Judith Maloney of West County Cider and her late husband Terry in 1994.

This year the festivities include a pancake breakfast, programs and sales at various locations throughout the county, canning classes, a home orchard workshop, tastings galore, and a special cider dinner.

Several local eateries will feature apple and cider items on their menus that weekend, including my beloved Green Emporium, where apple-cheddar pizza and appletinis are just the beginning of the apple madness.

This morning the Green Emporium featured cooking demonstrations by its chef, Michael Collins, and by Amy Traverso of Yankee magazine, the author of The Apple Lover’s Cookbook.

Amy also signed copies of her book, which was published in September by W.W. Norton. Norton sent me a copy of the book to review for a local paper. The book is a real find—a treasure trove of apple information (Amy has unearthed apple varieties completely new to me), stories of trips to orchards, and tempting recipes.

Amy has come to Cider Days several times although this is her first public appearance there. “Cider Days is something that my whole family looks forward to every year,” she told me.

“It’s just lovely to drive around rural Massachusetts for a day and taste apples! We may not live in wine country, but we certainly do live in cider country. I want to see New Englanders really embrace our cider heritage, and I’m so grateful to the Maloney family for helping put this drink [hard cider] back on the map. The festival seems to draw bigger crowds every year, so that’s really encouraging.”

I’m sorry that I didn’t post this in time to allow you to come to her signing—I’ve been having SERIOUS blog issues, just resolved thanks to my current hero (and always friend) Henry. Luckily, there are more events still to come this weekend.

>For a full schedule of activities visit this link. For a couple of apple and cider recipes (I’m posting this a little late so we have two today!), read on…


Farm Share Coleslaw

My mother’s darling nurse Pam Gerry told me months ago about her favorite coleslaw, which incorporates dill and apple with the cabbage.

I had to wait until fall to have the fresh ingredients with which to make it, however!

In early October our farm share turned up a small head of cabbage a couple of weeks ago—and we had apples on our trees and a small amount of dill still in the herb garden. The carrot was left over from a previous week’s farm share, and of course the cider vinegar was from Apex Orchards nearby.

Of course, you may tinker with the recipe and substitute something more conventionally coleslawy (maybe caraway seeds?) for the dill. I loved the fresh flavor it gave to the salad, however.

A generous friend sent me some REAL kosher corned beef and rye bread from New York City so I was able to make one of my favorite childhood sandwiches, corned beef with mustard and slaw. We got our cold cuts at a kosher deli where cheese was never mixed with corned beef so I never became a Reuben fan. But I adore coleslaw with my corned beef so between them Pam and Peter send me to heaven!

Ingredients:

1/2 small cabbage (about 3 cups when chopped), cored and loosely chopped or grated
1 small carrot, peeled and grated
1 small apple, cored and grated (remove skin if you like)
1/3 cup mayonnaise (plus or minus to taste)
2 teaspoons cider vinegar
2 teaspoons fresh dill leaves or a teaspoons dried dill weed (more or less to taste)
salt and pepper to taste (I used about 1/2 teaspoon salt and five turns of the pepper grinder)

Instructions:

Combine all ingredients in a medium bowl. Stir and adjust seasonings to taste.

If you have time, let the mixture sit in the refrigerator for a while to maximize flavor. Be sure to stir it before serving.

Makes about 2 cups.


Sherry Hager’s Cider Doughnuts

My friend Cynthia O’Connor asked me more than a year ago if I had a recipe for Cider Doughnuts. It took me a while, but I finally got one!

Hager’s Farm Market in Shelburne, Massachusetts, will offer a plethora of apple products for this year’s Cider Days, plus the market’s signature fried dough with maple cream. I persuaded Sherry Hager and her daughter Kim to part with the recipe for Sherry’s cider doughnuts, pastries that are particularly light and crispy thanks to the cider and buttermilk in their dough … and to the Hagers’ deep-frying skills.

Ingredients:

3-1/2 cups flour
2 teaspoons baking powder
1 teaspoon baking soda
1/2 teaspoon ground cinnamon
1/2 teaspoon salt
1/8 teaspoon nutmeg
4 tablespoons butter at room temperature (I used unsalted)
1 cup sugar
2 eggs
1/ 2 cup apple cider
1/2 cup buttermilk
canola oil as needed for frying

Instructions:

In a bowl combine the flour, baking powder, baking soda, cinnamon, salt, and nutmeg.

In another bowl beat the butter and sugar together with electric mixer. Mix in the eggs until they are thoroughly incorporated. Mix in the cider and buttermilk.

Dump in the dry ingredients and stir.

“Our secret is we let it refrigerate overnight,” says Kim of the dough.

The next day preheat the oil to 350 degrees in a large pan or fryer.

Roll the out dough on a floured surface; cut it with a doughnut cutter. This can be a little tricky even after refrigeration as the dough is sticky. As you can see from the photo, I gave up on doughnuts and formed my dough into freeform crullers.

Cook the doughnuts a few at a time until they are brown on each side, a minute or two per side.

Makes about 18 doughnuts and 18 holes.


23 September 2011

Apple-Cheddar Pie

Strangely, I’m not a major fan of pies, particularly apple pies. (I hope this doesn’t make me un-American.)

Nevertheless, every once in a while … particularly at this time of year … I feel impelled to bake an apple pie.

Yesterday was gray, and I was expecting company for supper. I hadn’t gotten very far in my menu planning. I knew we were having meatloaf; it was definitely a meatloaf kind of day. I also knew I needed to come up with some vegetables and a dessert.

One of my guests emailed me to say she would be happy to take care of the vegetables. So I was down to dessert.

I looked out the window for inspiration and was greeted by our apple trees, bursting with fruit.

The trees have been here much longer than we have. Most years they are purely decorative, bearing just a few mealy, wormy apples. I add them to applesauce out of habit but don’t eat or cook them much other than that.

Every three years or so, however, the fruit fates smile upon us and we suddenly find ourselves with enough apples to use multiple times. It turns out that 2011 is one of those years.

I took Truffle out for a quick walk, and in no time at all we had enough apples in our basket for a pie.

I was given this recipe many years ago by its creator, Rose-Ann Harder, who used to own a bakery in Greenfield, Massachusetts, called Rose-Ann’s. Her apple pie was one of her signature desserts. Somehow I never ended up trying it out until yesterday.

Knowing that many people accompany apple pie with a wedge of cheddar cheese, Rose-Ann incorporated cheese into her pie crust.

The cheese made the crust a little hard to roll out—at least for me, never the most deft of rollers. The difficulty was exacerbated by my lack of pastry flour. I substituted all-purpose flour, which may have made the crust more difficult to handle.

By the time the pie baked, however, the crust looked charmingly homespun rather than ragged. And it tasted perfectly autumnal, adding its savory flavor to the sweet filling.

Rose-Ann's Apple-Cheddar Pie

Ingredients:

for the pastry:

2/3 cup vegetable shortening
2 cups pastry flour
1 teaspoon salt
1 cup shredded Cheddar cheese
ice-cold water as needed

for the filling:

6 cups apples, sliced
1/2 cup granulated sugar
1/2 cup brown sugar, firmly packed
2 tablespoons flour, plus a bit more if the apples are very juicy
1 teaspoon cinnamon
1/2 teaspoon nutmeg
1/2 teaspoon salt

Instructions:

Cut the shortening, flour, and salt together with a pastry blender until they form nice crumbs. Add the cheese, then add cold water a bit at a time until the dough cleans the bowl. Roll the dough into two 9-inch crusts, and place the first crust in a pie pan.

Combine the filling ingredients, and place them in the pie pan. Cover with the other crust, and pierce air holes in the top. (Rose-Ann likes to draw a little apple on top, but that's beyond my skill.) Bake at 350 degrees for about an hour, until the apples are tender and bubbling out through the air holes. Serves 6 to 8.

02 September 2011

Ready to Eat

This post will be a little different from most since I’m not sharing a recipe. I promise to be back soon with something to cook. I always find apple time irresistible!

I’m simply describing an eating experience I encountered courtesy of Hurricane Irene.

As readers of my blog about caring for my mother know, my hometown of Hawley, Massachusetts, was hard hit by Irene … despite the fact that she had supposedly been downgraded to a Tropical Storm by the time she reached our community.

The roads in Hawley hew to the tradition of roads in many small communities—particularly hilly small communities. Our byways are built alongside brooks and rivers. Most of the time, this is a great idea. Why carve a road down a hill when you can just follow a stream around the hill?

During a hurricane, however, having one’s roads follow a river seems a lot less smart. Large parts of Hawley (including my own area, Pudding Hollow) were cut off during and after the hurricane by washed-out roads.

As a result, Hawley had its first ever (to my knowledge, at any rate) visit from FEMA. Federal and state officials helicoptered in to plan road repairs, bring medical help to a neighbor in need, and share food and water.

The food in question was a group of MREs—the ready-to-eat meals favored (or at any rate consumed) by our armed forces in the field.

Naturally, as a food person, I was fascinated by these. My mother and I really had no need for food. (Please don’t tell FEMA; this might be some sort of fraud!) Nevertheless, I asked for three of the meals.

The one I actually tried sounded intriguing. One somehow doesn’t expect to find Thai Chicken in MRE form.

A friend reminded me that Hawley is a bit far from Thailand. Even New York, where the MREs originate, is far from Thailand. So I’m not sure why I expected the food to be good. I guess I hoped it would be for the sake of the troops.

It took me a while to read the (very small, very obtuse) directions for heating the MRE with its “flameless heater,” a chemical pad that reacts to create heat when one adds a little water to its bag and then puts the bag in a box.


Even after I managed to decipher the directions, I didn’t quite heat the food correctly. I put both the chicken and its accompanying rice pilaf in the heater bag. Only the one closer to the little pad actually got warm. I resorted to my microwave for the other—not an option open to soldiers in the field.

The chicken and rice proved sadly bland … even when I added a little hot sauce from the enclosed miniature bottle (a nice touch). The dishes’ consistency was off putting as well; both were gummy.

The rest of the meal was pretty darn odd but designed, I guess, to put protein into soldiers. It consisted of vegetable crackers (today’s hard tack) with peanut butter, a peanut/raisin mixture, instant coffee (a tea bag provided an alternative), and chewing gum.

My friend Brett informs me that he and his fellow members of the 379th Engineers subsisted on these meals for weeks at a time overseas.

The whole thing gave me a renewed appreciation for our men and women in uniform. Risking their lives and leaving their families are bad enough. Having to eat bland, boring food … now, that’s too great a sacrifice.

When I learned that National Guard troops and other officials were working on the roads out of town it occurred to me that these men might be subsisting on MREs. I hastened to bake them some butterscotch brownies, and my neighbor Alice and I drove down to the road-construction site (very carefully) to distribute the treats.

I wish I could do the same for our troops everywhere.

Meanwhile, if you would like to help with hurricane relief in our area, please consider contributing relief supplies to the drive at our local elementary school, Hawlemont School in Charlemont. Coordinator Beth Bandy is asking for bottled water, nonperishable foods, cleaning supplies, baby food/formula, pet food, clothing, and anything else that might be helpful. She is also looking for drivers with hardy cars to deliver the supplies. For more information on the drive, call Beth at 413-337-4291.

Beth has also set up a Facebook page for her efforts.

And if you’d like to hear an abridged audio version of my blog post about our own hurricane experience, here’s the link for my commentary on WFCR-FM.

23 May 2011

Easier Than Pie: Lily's Salsa Verde Chicken

The phrase “easy as pie” sometimes bothers me. I don’t think pie is super difficult to prepare. It does take some time, however, to make, chill, and roll out a pie crust. So I don’t think pie should be the standard for ease.

And I do love ease. As readers who follow other my blog, Pulling Taffy, know, most of my time these days is taken up with care for my elderly mother, who suffers from dementia.

One of Taffy’s quirks at this point in her life is that she really HATES to be alone, even for a few minutes. So my dinner-prep time is limited.

This chicken casserole suits me perfectly. I can chop the onion while chatting with her. The only time I have to be in the kitchen is the five minutes or so it takes to brown the chicken, a task I try to accomplish while my mother naps.

The recipe was suggested by a vendor I met at the farmer’s market near me in Alexandria, Virginia, last week. Lily Castaño is the creator of Salsa Las Glorias, a range of salsas that are in indeed glorious. I bought way too many of them!

Perhaps I should feel guilty about cooking with a pre-made product. When tomatillos come into season, I can always make my own salsa verde as I did in a previous recipe for Salsa Verde Pie.

Meanwhile, Lily’s super-fresh salsa is a far cry from a can of soup. And her chicken idea (roughly translated by me) is delicately flavored yet satisfying. The sour cream adds just a little extra smoothness.

The dish is highly flexible. Use leftover chicken if you like, and/or make it with unboned unskinned chicken for extra moisture. (Just make sure you cook the chicken through!) I seem to remember Lily sometimes used herbes de Provence; I might try a little cumin next time. And when I heated up leftovers the other day I threw in some ripe olives, which added color (yes, black is a color!) and flavor.

Please note that although this recipe served my mother and me plus our dog you may want to add more chicken. Only you know whether your family members routinely eat a whole or a half chicken breast for dinner.

Lily’s Salsa Verde Chicken

Ingredients:

1 boned, skinned chicken breast
a small amount of olive oil for browning
salt and pepper to taste
1/3 cup salsa verde
1/2 medium onion (a sweet onion is particularly nice in this), chopped
sour cream as needed

Instructions:

Preheat the oven to 350 degrees.

Slice the chicken breast in half along the vertical edge so that you have two thin cutlets with the same shape as the original breast.

In a medium pan over a medium-high flame heat the oil until it shimmers. Brown the cutlets briefly on both sides, adding a light amount of salt and pepper.

Transfer the cutlets to a baking dish. Cover with the salsa and then the onion pieces.

Cover the baking dish and bake for 45 minutes. Serve over rice and garnish with sour cream. Serves 1 to 2.


06 May 2011

Spicy Jam Cake

My friend Peter from New York and Massachusetts came to visit my mother and me in Virginia this week. His dogs Lucca and Marco enjoyed a joyous reunion with my own Truffle.

We wanted to celebrate the visit—and to mark Peter’s birthday, which took place last week.

We tried barbecue from not one but two different local venues here in Fairfax County. It left a sweet and tangy taste in our mouths, the perfect preview for the cake I whipped up for the occasion.

Peter is NOT a standard birthday-cake boy. He esc hews your basic chocolate and white cakes.

In the past, I have made him other recipes on this blog, including Teri’s Pumpkin Cake (probably his all-time favorite in my repertoire) and Rhubarb Baked Alaska.

So I thought this spicy jam cake would suite him well—and it did. The spices predominate. The jam barely makes a statement, but it does make the cake delightfully moist.

I adapted the recipe from the Treasury of Tennessee Treats, an elderly but useful community cookbook sent to me recently by my friend Kelly Boyd, a native of Athens, Tennessee.

Jam and Spice Cake

Ingredients:

3/4 cup (1-1/2 sticks) sweet butter
1 cup sugar
4 eggs
1 teaspoon cinnamon
1/2 teaspoon cloves
1/2 teaspoon nutmeg
1/4 teaspoon ginger
1 teaspoon baking soda, dissolved in 1/4 cup buttermilk
2 cups flour
13 ounces (weight—1 very generous cup in volume) jam (I used raspberry)

Instructions:

Preheat the oven to 375 degrees. Grease and flour a 10-inch Bundt pan.

Cream together the butter and sugar. Beat in the eggs, one at a time, followed by the spices and dissolved baking soda.

Stir in the flour, followed by the jam.

Pour the batter into the prepared pan (the batter will be a rather sad-looking color—sort of a grayish mud--but it will turn a lovely brown in the oven) and bake until a toothpick inserted into the center comes out clean. In my so-so electric oven this took 30 to 35 minutes.

Let the cake cool in its pan on a rack for 10 minutes; then invert and remove it and let it finish cooling. Ice with cream-cheese frosting.

Serves 12.

28 March 2011

Maple Butterscotch Sauce

I’m a little late to the party celebrating Massachusetts Maple Month—but at least I can offer a small contribution.

Sometime the simplest recipes are the best. Sometimes they're also the only ones for which a home cook has the time and the ingredients.

I originally hoped to share my friend Pat’s prize-winning recipe for maple lace cookies. Our extended family was coming to dinner Saturday evening, and I was all set to make these wafers—or so I thought.

Unfortunately, I couldn’t find the key ingredient in my pantry: maple sugar! So I punted and made a maple-based sauce for ice cream instead.

Very rich and very sweet, it works beautifully poured in small quantities over ice cream. Toasted walnuts or pecans make a festive garnish.

As for the cookies, well, I can make them NEXT March………

My nephew Michael had no trouble finishing his maple butterscotch sundae!
The Sauce

Ingredients:

1/2 cup (1 stick) sweet butter
1/2 cup brown sugar, firmly packed
1 pinch salt
1/2 cup maple syrup
1/2 cup heavy cream

Instructions:

In a 2-quart saucepan over medium heat melt the butter, stirring constantly. Add the brown sugar and stir until it melts. Continue to stir or whisk as the mixture comes to a boil. Boil for 2 minutes, stirring constantly.

Whisk in the maple syrup. The mixture will look a little weird at first, but it will come together eventually! Return the mixture to a boil, whisking constantly, and boil it (still whisking!) until it coats a spoon. This took about 3 minutes on my weird electric stove.

Remove the pan from the heat and whisk in the cream. Let the sauce cool slightly before serving it with ice cream. (You may also let it cool to room temperature and then refrigerate it until you are ready to use it. At that point warm it slightly in the microwave.)

Makes just over 1-1/2 cups.
 

15 March 2011

Surprise Soda Bread

I love Saint Patrick’s Day.

As I noted a couple of years ago on this blog in a discussion of my unsainted great-grandmother, I’m only marginally Irish. Nevertheless, I’ve always embraced this holiday.

It’s cheerful at a time when the landscape in my beloved New England is gloomy.

It’s associated with any number of popular Irish and Irish-American songs.

Some are humorous, such as “Who Threw the Overalls in Mistress Murphy’s Chowder” and “Harrigan.” Only George M. Cohan could have constructed the interior rhymes in the latter.

Others are sentimental to the point of being maudlin. Since a lot of beer is drunk on this holiday no one objects.

I fully expect to evoke tears from the audience when I pay musical tribute to “me mither” during my little solo at our local Saint Patrick’s Day concert. (I’ll be singing “An Irish Lullaby.”)

I also love Saint Patrick’s Day because I look fabulous in green.

And because I love, love, love soda bread.

I’ve already posted recipes for white and whole-wheat soda bread. This year I’m using a recipe cribbed (with thanks!) from Cabot Cheese.

As soon as I saw Cabot’s Cheddar Soda Bread I knew it would be just the thing to serve with corned beef and cabbage or Irish beef or lamb stew.

I have changed the recipe a little, of course.


First, I upped the Irish ante by using Irish cheddar—laced with porter. The marbled cheese gave the bread a gorgeous mottled look. The original cheddar might taste sharper, but this version still had lots of cheesiness. I can’t wait to try this cheese in my Irish cheese fondue.

Second, I switched Cabot’s salted butter to unsalted (there’s plenty of sodium in this recipe without more in the butter—and I say this as a girl who loves her salt) and used Kerrygold Irish butter.

Third, I threw in some caraway seeds. They are often used in soda bread. I find them a little strong in sweet breads, but they complement this savory recipe beautifully.

Enjoy—but eat sparingly. This bread is very filling.

And if you’re in Alexandria, Virginia, Thursday night, come sing along with me and the Montebello Singers....


Surprise Soda Bread

Ingredients:

2-1/2 cups flour
2 teaspoons baking powder
1 teaspoon baking soda
1/2 teaspoon salt
1 teaspoon caraway seeds
1/4 cup (1/4 of a 1/2-pound package) Irish butter
1/2 pound Irish cheddar with porter (or stout!), grated
1 cup buttermilk
1 egg

Instructions:

Preheat the oven to 375 degrees. Lightly grease a cookie sheet or line it with a silicone mat.

In a medium bowl whisk together the flour, baking powder, baking soda, salt, and caraway seeds. Stir in the cheese and blend well.

In a small bowl or measuring cup, whisk together the buttermilk and the egg. Stir them gently into the dry ingredients.

Turn the mixture onto a lightly floured board and knead it a few times, until it holds together into a slightly flattened ball.

Pop your ball onto the prepared cookie sheet. You may cut a cross in the center, but my cutting wasn’t very successful so I would leave well enough alone.

Bake until the loaf has light brown spots and a toothpick inserted into the center comes out clean—35 to 40 minute or so.

Slice into small wedges (12 to 14).

Makes 1 loaf.

07 March 2011

Jambalaya

Tomorrow is Mardi Gras. If I had the time—and the waistline—I’d make a King Cake and maybe some beignets. (I’ve never made beignets, but there’s always next Mardi Gras.)

Instead this past weekend I paid tribute to the holiday with my favorite Louisiana main dish, Jambalaya.

I first encountered Jambalaya (or a form thereof) in college. The cooks at Mount Holyoke included something they called “Creole Jambalaya” on their monthly menu.

In general, the food at Mount Holyoke was pretty tasty. As I recall, however, the Jambalaya was neither tasty nor Jambalaya. It was creamed shrimp and some sort of other protein served over rice. I was unimpressed.

In Knoxville, Tennessee, however, I learned that I like Jambalaya A LOT.

My roommate at the University of Tennessee, Alice Gagnard, hailed from Alexandria, Louisiana. Alice made fabulous Cajun food.

The gumbos! The po’ boys! The Jambalaya!

I have yet to master the craft of gumbo, although I did get a great recipe from Cajun folklorist Barry Ancelet a couple of years ago.

I hope this coming summer to share with you the po’ boys Alice makes with her husband Kevin.

Meanwhile here is a recipe for Jambalaya.

This dish is appealing on a lot of levels. First, it is relatively inexpensive to prepare since you can mix in a combination of whatever forms of protein suit your budget (or lurk in your refrigerator). In addition to the chicken and sausage below, Jambalaya may be enjoyed with ham, shrimp, and even crawfish.

Second, its form (or lack thereof; it’s a very flexible food) reflects the mixed heritage of Louisiana itself, where French, African, Native American, English, and Spanish influences abound.

In an article titled “Jambalaya by Any Other Name,” food and travel writer Andrew Sigal describes his extensive research into the possible origins of the dish. He concludes that different cooks (and fans) may always have different ideas about where it came from.

He does note that that the Provençal term “jambalaia,” from which scholars believe Jambalaya got its name, originally meant “a mish-mash, rabble, or mixture.”

This pretty much sums up Jambalaya as far as I’m concerned. How can one not love preparing a recipe that means “rabble” and that sound like “jumble”?

Happy Mardi Gras! I can’t find most of my Mardi Gras attire, alas, so I leave you with a photo of me from a couple of years ago when I made King Cake.


Mardi Gras Jambalaya

Ingredients:

1 pound sausage (for true—but very dominant—Louisiana flavor, use andouille, but you may also use plain old kielbasa), cut into bite-sized pieces
extra-virgin olive oil as needed for frying
1 medium onion, finely chopped
1 to 2 stalks celery, finely chopped
1/2 bell pepper, finely chopped
1 clove garlic, finely chopped
butter if needed for frying
2 cups cut-up cooked chicken
1-1/2 teaspoons Creole seasoning, plus more if needed
chopped hot pepper (fresh or pickled) to taste—start out with 1/2 teaspoon to a teaspoon; then add more the next time if you want your Jambalaya spicier
4 cups chicken stock, divided
1-1/2 cups uncooked rice
1 large or 2 small tomatoes, roughly chopped
2 cups cooked peas
lots of chopped fresh parsley

Instructions:

In a heavy Dutch oven brown the sausage pieces. If they are not very fatty and start sticking a lot, splash in a little olive oil. If they are very fatty, drain some of the fat off when they have browned. Remove the sausage and set it aside.

In the fat (plus a little olive oil and butter if needed) sauté the onion, celery, bell pepper, and garlic. Cook them until they soften and begin to smell wonderful. Use their juices and the fat in the pan (plus a spatula or wooden spoon) to scoop up any brown bits from the bottom of the pan.

Return the sausage to the pot, along with the chicken, the seasoning, the hot pepper, and 1 cup of the stock. Bring the mixture to a boil. Cover, reduce the heat to low, and simmer gently for 1/2 hour, stirring from time to time.

Add the remaining stock. Bring the mixture to a boil, and stir in the rice. Return the mixture to boiling, stir, and reduce the heat and cover again.

Simmer until the rice is cooked through but not dry, about 1/2 hour longer. Taste for seasoning and add a little more spice if you like.

Stir in the tomatoes and peas. Sprinkle parsley overall and serve with Tabasco sauce on the side.

Serves 6.


25 February 2011

Tea and Biscuits: The King's Speech Shortbread


Alas, once again I am unprepared for the Academy Awards. I’ll watch the ceremony, OF COURSE, but I’m not having a party. And the only nominated film I have seen this season is How to Train Your Dragon.

I guess I spend too much time with the very young and the very old!

Not having seen most of the films doesn’t keep me from thinking about what might have been eaten in them. I may not have a dish for each of the best-picture nominees as I did in my filmgoing heyday, but I did want to offer one recipe for those of you who are looking for an Oscar nibble this year.

I have seen photos of Helena Bonham Carter pouring tea as Queen Elizabeth, consort of King George VI (Colin Firth), in The King’s Speech, so I know that tea and biscuits are appropriate for this film.


It’s one of the nominated films I really look forward to seeing. History, human drama, tea, and Colin Firth all in one cinematic package. Not to mention a celebration of the human voice. Who could ask for anything more?

I was tickled to learn that PG Tips Tea is holding a King’s Speech/Oscar tea contest.

This British tea company bills itself as “the ONLY tea being served in the Oscars’ Green Room.”

I’m not sure this is a huge honor since I have a feeling that the Hollywood glitterati might favor stronger beverages on Oscar night. But a tea-party contest is a fun idea.

PG Tips is inviting tea fans to send in photos of people sipping its tea at an Oscar party. Where the photos are supposed to be sent is a mystery, but I have asked the company’s publicist to let me know. When she does I’ll update this blog post.

Meanwhile, here’s a recipe for shortbread, a cookie type that always goes well with tea.

Unfortunately, I don’t have any George VI china for my Oscar party. I did find a little cup in our China cupboard from the coronation of his father, George V (played in the film by Michael Gambon).

The back of the cup features the lyrics to “God Save the King.”

I have a feeling that director Tom Hooper and company will be humming that song quietly Sunday night as the envelopes are opened………


King’s Speech Shortbread

Ingredients:

1/2 cup (1 stick) sweet butter
1/3 cup confectioner’s sugar
1 pinch salt
1 pinch baking powder
1 cup flour

Instructions:

Thoroughly blend the butter and the sugar. Beat in the salt and baking powder; then stir in the flour.

The mixture will be crumbly!

Mold your crumbs into a ball or at least a blob. Wrap the blob in waxed paper and refrigerate it for 1 hour.

At the end of the hour preheat the oven to 350 degrees.

Gently pat the blob into a 1/4- inch-thick rectangle on a silicone mat or a plastic cutting board. Cut the rectangle into 12 smaller rectangles. Gently place the rectangles on an unbuttered cookie sheet.

Prick holes in the rectangles. Bake the cookies—pardon me, the biscuits--for 20 to 25 minutes until they begin to turn golden on the edges.

Cool on a cookie rack. Makes 12 cookies.

18 February 2011

For the Love of Film (Noir): On the Road to Key Largo


This post contributes to the rich film-noir blogathon currently hosted by Ferdy on Films and the Self-Styled Siren.

Funds donated by clicking on the image below will go to the Film Noir Foundation. Donors are eligible for prizes, but the real prize is getting to help restore the 1950 film The Sound of Fury—and getting to read all the great posts the blogathon is attracting!


When as a child I first visited Paris with my godmother I was astonished to find
that many French people were aware of the relatively obscure place in which she lived, Key Largo, Florida.

The reason for this familiarity was not a knowledge of U.S. geography but a knowledge of American film history.

As early fans of classic directors like John Huston and as countrymen of the critics who invented the term “film noir,” the French knew and loved Huston’s 1948 noir gangster movie set on, partly shot on, and named after my godmother’s home Key.


Key Largo
always merits a visit. It grips today’s viewers yet remains a true product of its time.

A melodrama of postwar malaise, the film takes place in and around the Largo Hotel, a resort owned by James Temple (Lionel Barrymore) and his widowed daughter-in-law Nora (Lauren Bacall).

Humphrey Bogart plays Frank McCloud, a footloose former soldier who steps off a bus on Route 1 and becomes involved against his will in the hotelkeepers’ conflict with underworld kingpin Johnny Rocco (Edward G. Robinson) and his henchmen.

In the course of an hour and 41 minutes, the disillusioned McCloud learns to commit himself to the cause of right—and to the cause of Nora Temple. He also braves a hurricane that changes everyone’s plans.

The movie is a goldmine for social historians. It can be viewed as a metaphor for Americans on the brink of the Cold War, learning like McCloud to become involved in a new fight.

The hero’s decision at the film’s finish to end his rootless existence and settle down with the Temples also mirrors our culture’s postwar emphasis on the importance of home as haven.


Key Largo is more than just a story for its time, however. It is a lush, well paced picture with glorious black-and-white photography by Karl Freund.

It is also a primer in American film acting, featuring a range of diverse yet complementary styles.

On one end of its spectrum are the minimalist Bogart and Bacall, whose faces and voices come across as almost expressionless.

Only a couple of gestures and a few mutual looks indicate that Frank and Nora have fallen in love in the course of the film, but those gestures and looks are so well choreographed that they speak volumes.


In contrast, Robinson delivers a powerful, cigar-chomping personification of evil, filling the screen with his body and voice.

Claire Trevor joins him in the ham portion of the thespian spectrum with a magnificently campy performance as his character’s alcoholic, over-the-hill moll. The role earned her an Academy Award.

When she takes center stage to reprise her old nightclub routine in a creaky voice, Trevor’s character provides the film’s most moving moment.


Every time I think about Key Largo the film I long to visit Key Largo the place. I dream of flying down to Miami, then traveling—like Bogey’s character—on a Greyhound bus along Route 1.

I don’t exactly have the time or the funds to take this trip, however, so I settle for recreating my favorite tropical spot at home.

Since I’ll never look like Bacall or Claire Trevor my costume is a simple lei. Nevertheless, I do work hard to make food that features the Keys’ signature food, key-lime juice. And of course I watch Key Largo.

If you’d like to have your own Key Largo party, don’t make do with the juice of ordinary limes; it hasn’t got the subtle, rich flavor of the key lime.

Many supermarkets carry Nellie & Joe’s key-lime juice. You may also order juice by mail from Floribbean; this company also sells such goodies as key-lime salsa, jelly, and savory oil.

Or call my favorite key-lime store, the Key Lime Tree.

This emporium, located (where else?) on Key Largo not far from my godmother’s home, offers a plethora of key-lime products, from beverages to fudge to fabulous soap, plus OF COURSE key-lime juice.

Last time I checked in, its owners would even ship out a small key-lime tree to help you add some scenery to your Key Largo bash.


Settle yourself under the tree’s thorny branches; sip a key-lime beverage; and prepare to spend an evening with Bogart, Bacall, and company.

I have already featured several key-lime recipes on this blog. These include key-lime chicken; tropical fruit salsa; key lime-white chocolate chip cookies; and everybody’s favorite, key-lime pie.

I thought readers might like a cocktail to accompany a viewing of Key Largo, however. What could be more appropriate for this stormy film than a hurricane?

This tropical drink packs quite a wallop. Claire Trevor’s Gaye Dawn (a PERFECT Florida Keys name!), who drinks her way through the movie, would appreciate it, although she doesn’t at all appreciate the natural disaster from which it derives its name.

If you cannot find passion-fruit syrup in your local grocery or liquor store, it may be found online at Amazon and other sites. Some bartenders take a shortcut and substitute 1/2 cup of Hawaiian Punch. This doesn’t strike me as appropriate for a celebration of film noir, however.


Key Largo Hurricane

Ingredients:

1 ounce light rum
1 ounce dark rum
1 tablespoon passion-fruit syrup
1 tablespoon key-lime juice (more or less to taste)

Instructions:

Combine ingredients in a cocktail shaker with ice. Strain into a cocktail glass. Serves 1.

14 February 2011

For the Love of Film (Noir): Ready for Her Closeup


This post is my contribution to an internet event hosted by two wonderful blogs, Ferdy on Films and the Self-Styled Siren. Last year the two collaborated on their first film-preservation blogathon, For the Love of Film. This year, they are focusing in on Film Noir. This dark (in more ways than one) film genre features paranoid heroes, shady ladies, and fateful drama.

Funds donated by clicking on this link (you KNOW you need to do it!) will go to the Film Noir Foundation. Donors are eligible for prizes, but the real prize is getting to help restore the 1950 film The Sound of Fury—and to read all the great posts the blogathon is attracting.

When Ferdy and the Siren announced that they were devoting this year’s blogathon to Film Noir, I wasn’t sure whether I’d be able to come up with a film to write about. To be frank, I’m not a noir girl. As a sometime intellectual I appreciate films noirs aesthetically, but as an eternal movie fan I like to identify with characters in films, particularly female characters.

Most noir female protagonists, while interesting, are hard to identify with. They’re too busy being femmes fatales, often literally.

And then I remembered Norma Desmond, who taught me a lot about the way we relate to films—and about the aging process.


Norma Desmond is the iconic heroine (I see her as a heroine, anyway) of Billy Wilder’s 1950 film Sunset Boulevard. Played with studied camp and seemingly effortless glamour by Gloria Swanson, Norma is a relic of a recent (in 1950) but almost forgotten (also in 1950) facet of Hollywood’s history, the silent-film industry.

When sound film came along, many performers’ careers were finished. And so it was that the premise of the film–that a woman of 50 who had been an enormous star 20 years earlier was now almost forgotten–could be believable.

Wilder took advantage of that believability by casting several silent-film greats as Norma Desmond’s bridge-playing cohorts; the film’s younger, irreverent narrator, Joe Gillis (William Holden), refers to them as her “Wax Works.” Swanson herself hadn’t been in a successful film in many years, although she had kept busy on the stage.

Norma Desmond deals with her exile from stardom by denying it, by trying to live as much as possible in the past. She fastens on to Joe, an out-of-work screenwriter, as a possible vehicle for her comeback (she actually prefers the word “return”).

She hires Joe to revamp the script she hopes will re-launch her career and soon turns him into a kept man ensconced in her fading old mansion.


Joe grows more and more resentful, and Norma grows more and more delusional. Norma’s final murder of Joe is no surprise since it is previewed in the film’s opening shots. Nevertheless, Wilder managed to make the film’s ending sad, haunting, and more than a little scary.

When I first saw Sunset Boulevard I was about 20. I already had a major crush on William Holden and tended to see the film through his character’s eyes. To the young me Norma Desmond was a frightening old witch, and I rooted for Joe Gillis to end up with the more age-appropriate Betty Schaefer (Nancy Olson).

A reader at a studio, Betty criticizes Joe’s newest screenplay early in the film. Viewers later learn that she is harsh because she believes he has potential. The two end up collaborating on a screenplay late at night when Norma is asleep. Betty says she wants to work on the screenplay because she is ambitious, but she doesn’t want to work on it without Joe, with whom she is obviously smitten.

She is presented as the anti-Norma, young and interested in promoting Joe (a traditional feminine attitude) rather than herself. She allows herself to be kissed by Joe rather than reaching out to grab him as Norma does.


Norma says she is in love with Joe, but she wants him to bolster her ego and her career; his career is of secondary interest to her (if it is of interest at all).

When the young me watched Sunset Boulevard, she asked all the “what if” questions about Joe that the film encourages: what if Joe had gotten away from Norma; what if he had become a good, honest screenwriter; and so forth.

I saw Sunset Boulevard again in a film class when I was in my early 30s, as part of a discussion of classical Hollywood narrative. I found myself crying at the picture’s end.

I wasn’t crying for poor dead Joe, however. I was crying for poor live Norma. And I cry for her now each time I see the film.

I admit that the character has major flaws. She is vain, selfish, prone to emotional blackmail, and ultimately insane. Nevertheless, as another memorable Billy Wilder character later said, “Nobody’s perfect.”

Betty’s major appeal is that she is 22 years old. Anybody can be 22—or at least, just about everybody is 22 at some time or other.

Norma is hardworking, talented (she is luminescent in the scenes from her silent-film work projected in her living room, real footage of Swanson in the unfinished film Queen Kelly), and barely middle aged.

The scene in which she sails in to the Paramount Pictures lot to confer with her former director, Cecil B. DeMille, is touching. She meets several of the “little people” with whom she used to work—a security guard, an electrician, a hairdresser—and one gets a sense of what the young Norma Desmond might have been like.

DeMille’s character describes her as “a plucky little girl of seventeen, with more courage and wit and heart than ever came together in one youngster.”


The older Norma may have lost some of her wit(s). She still has a lot of courage, if not quite enough to face what has become of her stardom and her audience. And she exhibits all too much heart.

It’s a tribute to the power of film—to the power of a good film, anyway—that I can relate to different characters and different storylines at different ages.

Perhaps when I’m 65 or so I’ll identify with Max von Mayerling, Norma’s butler, who is also her ex-husband and former film impresario. In a sense Max is the most selfless person in the film, since he lives only to give Norma Desmond what she wants.


Or maybe I won’t identify with him. I’ve never been completely selfless.

Moreover, it’s hard not to remember that Max is played by Eric von Stroheim, whose reputation went a little overboard in the NON-selfless direction.

According to Billy Wilder, this egotistical, autocratic former film director threatened to sue the Academy of Motion Picture Arts and Sciences for nominating him as best supporting actor in Sunset Boulevard because he COULD NEVER BE a supporting player. (Wilder may have made the story up, but it's plausible.)

We’ll see how the film strikes me when I hit 65.

In any case, I urge readers to watch the film again (or for the first time) and tell me whom they identify with.

On to a recipe……

I thought long and hard about recipe choice for this post. I might have selected something organic and vegetarian; Gloria Swanson was a noted health-food enthusiast and an early proponent of local, organic foods.

I almost made the biscuits in this 1933 recipe (if you can call it that;it’s just cheese added to biscuits), which a Bisquick recipe booklet claimed was a Swanson favorite.


In the end I decided to honor Film Noir as a whole with a Valentine’s Day adaptation of the classic Icebox Cake. One if the visual signatures of many films noirs is a series of bars across the screen (often across actors’ faces) that symbolize the shadows that hover over the doomed characters, and the prisons that many film-noir protagonists create for themselves.

When sliced at an angle, icebox cakes create lovely black-and-white lines that evoke the bars.

You can follow the growing tally of participants in this blogathon by checking out the lists at Ferdy on Films and the Self-Styled Siren. And PLEASE don't forget to donate to the Film Noir Foundation!


Film Noir Torte

Adapted from Nabisco

Ingredients:


2 cups heavy cream
1 teaspoon vanilla
several tablespoons framboise or Chambord (raspberry liqueur)
1/2 pint raspberries (more if you like and can afford them!)
1 package (9 ounces) Nabisco Famous Chocolate Wafers (these flat, round chocolate cookies are difficult but not impossible to find; just ask around at area grocery stores)

Instructions:

Whip the cream until stiff peaks form. Fold in the vanilla and liqueur.

Gently crush 2/3 of the raspberries and fold them carefully into 1/2 of the flavored whipped cream. Reserve the remaining whipped cream.

Spread about 1-1/2 tablespoons of the raspberry/cream mixture onto a wafer. Top it with another wafer. Stack them standing up until you have 9 or 10 wafers; then gently lay the stack on its side on a serving plate. Repeat, adding to the horizontal stack, until you have used up the remaining wafers.

Cover the log of stacks with the remaining whipped cream.

Refrigerate, gently covered, for at least 4 hours.

Remove from the fridge just before serving and garnish the torte with the remaining raspberries. Slice diagonally so that black-and-white bars appear.

Nabisco’s original recipe says its cake serves 14; in my family, it served 8 to 10.